OAI Core and RAN Testbed Deployment and E2E testing
Be sure you have followed the installation guide before trying these exercises.
These exercises will take you from a system with only the Nephio Management cluster setup to a deployment with:
- A Core cluster
- A Regional cluster
- An Edge Cluster
- Repositories for each cluster, registered with Nephio, and with Config Sync set up to pull from those repositories.
- Inter-cluster networking between those clusters
- A complete OAI Core, RAN and UE deployment including:
- NRF, AUSF, UDR, UDM, MYSQL (Database backend for UDR) running on the Core cluster and communicating via the Kubernetes default network
- AMF, SMF running on the core cluster and attached to the secondary Multus networks as needed
- UPF running on the Edge cluster and attached to the secondary Multus networks as needed
- CU-CP running on the Regional cluster and attached to the secondary Multus networks as needed
- CU-UP and DU (RF Simulated) running on the Regional cluster and attached to the secondary Multus networks as needed
- NR-UE (RF Simulated) running on the Regional cluster and attached to the secondary Multus networks as needed
Above described deployment configuration is illustrated in the following figure:
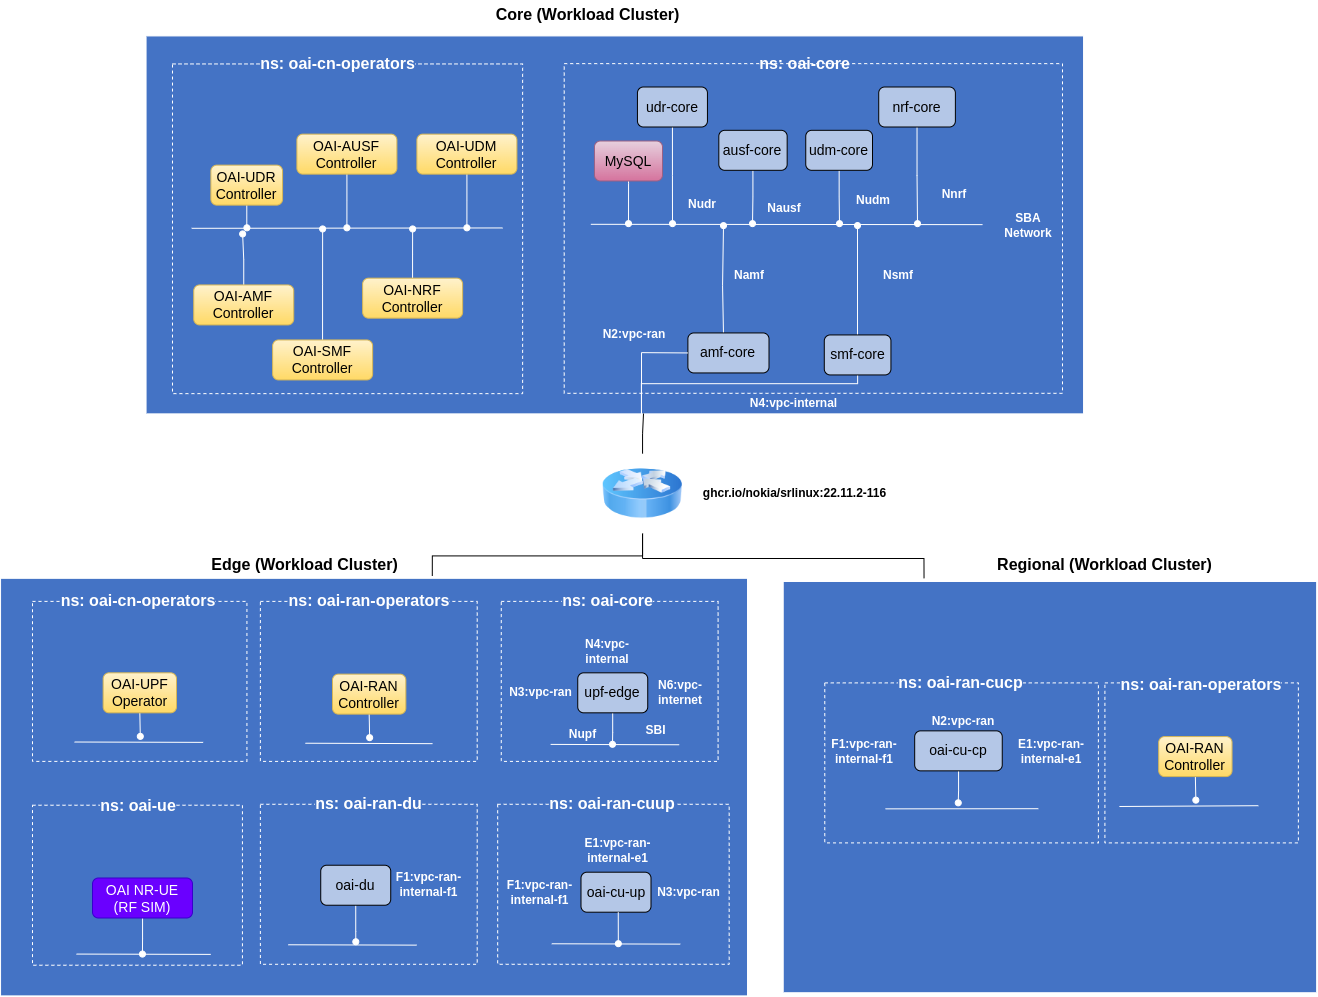
The placement of Core and RAN network functions and the naming of the clouds is referred from O-RAN.WG6.CADS-v4.00 TR page 23.
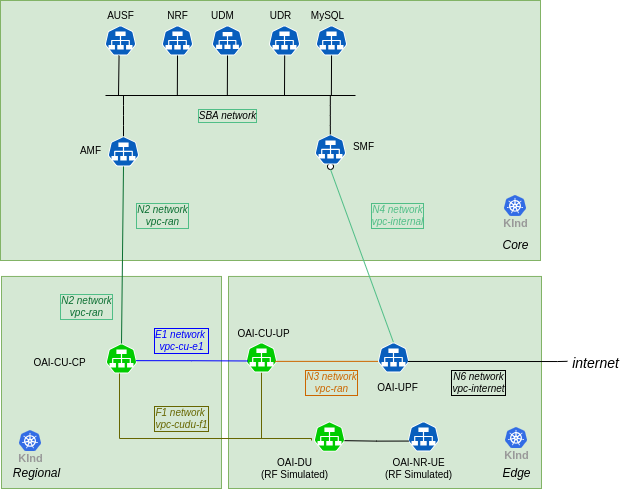
The network configuration is illustrated in the following figure:
To perform these exercises, you will need:
- Access to the installed demo VM environment and can login as the
ubuntuuser to have access to the necessary files. - Access to the Nephio UI as described in the installation guide
Access to Gitea, used in the demo environment as the Git provider, is optional.
Step 1: Setup the infrastructure
Our e2e topology consists of Regional, Core and Edge cluster. First, check to make sure that both the mgmt and mgmt-staging repositories are in the Ready state. The mgmt repository is used to manage the contents of the Management cluster via Nephio; the mgmt-staging repository is just used internally during the cluster bootstrapping process.
Use the session just started on the VM to run these commands:
Note
After freshdocker install, verify docker supplementary group is loaded by executing id | grep docker.
If not, logout and login to the VM or execute the newgrp docker to ensure the docker supplementary group is loaded.
kubectl get repositories
The output is similar to:
NAME                        TYPE   CONTENT   DEPLOYMENT   READY   ADDRESS
catalog-distros-sandbox     git    Package   false        True    https://github.com/nephio-project/catalog.git
catalog-infra-capi          git    Package   false        True    https://github.com/nephio-project/catalog.git
catalog-nephio-core         git    Package   false        True    https://github.com/nephio-project/catalog.git
catalog-nephio-optional     git    Package   false        True    https://github.com/nephio-project/catalog.git
catalog-workloads-free5gc   git    Package   false        True    https://github.com/nephio-project/catalog.git
catalog-workloads-oai-ran   git    Package   false        True    https://github.com/nephio-project/catalog.git
catalog-workloads-tools     git    Package   false        True    https://github.com/nephio-project/catalog.git
mgmt                        git    Package   true         True    http://172.18.0.200:3000/nephio/mgmt.git
mgmt-staging                git    Package   false        True    http://172.18.0.200:3000/nephio/mgmt-staging.git
oai-core-packages           git    Package   false        True    https://github.com/OPENAIRINTERFACE/oai-packages.git
Since those are Ready, you can deploy packages from these repositories. You can use our pre-defined PackageVariantSets for creating workload clusters
kubectl apply -f test-infra/e2e/tests/oai/001-infra.yaml
The output is similar to:
packagevariant.config.porch.kpt.dev/oai-core-clusters-mgmt-core created
packagevariantset.config.porch.kpt.dev/oai-regional-clusters created
packagevariantset.config.porch.kpt.dev/oai-edge-clusters created
It will take around 15 mins to create the three clusters. You can check the progress by looking at commits made in gitea mgmt and mgmt-staging repository. After couple of minutes you should see three independent repositories (Core, Regional and Edge) for each workload cluster.
You can also look at the state of packagerevisions for the three packages. You can use the below command
kubectl get packagerevisions | grep -E 'core|regional|edge' | grep mgmt
While you are checking you will see LIFECYCLE will change from Draft to Published. Once packages are Published then the clusters will start getting deployed.
Step 2: Check the status of the workload clusters
You can check if all the clusters have been added to the management cluster:
kubectl get cl
or
kubectl get clusters.cluster.x-k8s.io
The output is similar to:
NAME       CLUSTERCLASS   PHASE         AGE   VERSION
core       docker         Provisioned   34m   v1.26.3
edge       docker         Provisioned   34m   v1.26.3
regional   docker         Provisioned   34m   v1.26.3
To access the API server of that cluster, you need to retrieve the kubeconfig file by pulling it from the Kubernetes Secret and decode the base64 encoding:
kubectl get secret core-kubeconfig -o jsonpath='{.data.value}' | base64 -d > $HOME/.kube/core-kubeconfig
kubectl get secret regional-kubeconfig -o jsonpath='{.data.value}' | base64 -d > $HOME/.kube/regional-kubeconfig
kubectl get secret edge-kubeconfig -o jsonpath='{.data.value}' | base64 -d > $HOME/.kube/edge-kubeconfig
export KUBECONFIG=$HOME/.kube/config:$HOME/.kube/regional-kubeconfig:$HOME/.kube/core-kubeconfig:$HOME/.kube/edge-kubeconfig
To retain the KUBECONFIG environment variable permanently across sessions for the user, add it to the ~/.bash_profile and source the ~/.bash_profile file
You can then use it to access the Workload cluster directly:
kubectl get ns --context core-admin@core
The output is similar to:
NAME                           STATUS   AGE
config-management-monitoring   Active   33m
config-management-system       Active   33m
default                        Active   34m
kube-node-lease                Active   34m
kube-public                    Active   34m
kube-system                    Active   34m
local-path-storage             Active   33m
metallb-system                 Active   33m
resource-group-system          Active   32m
You should also check that the KinD clusters have come up fully with kubectl get machinesets. You should see READY and AVAILABLE replicas.
kubectl get machinesets
The output is similar to:
NAME                        CLUSTER    REPLICAS   READY   AVAILABLE   AGE     VERSION
core-md-0-fwksw-fqmq7       core       1          1       1           2m28s   v1.26.3
edge-md-0-2z48t-bktd2       edge       1          1       1           2m28s   v1.26.3
regional-md-0-mwnzd-4kl4h   regional   1          1       1           2m28s   v1.26.3
Once all the clusters are ready, it is necessary to connect them. For now you are using the containerlab tool. Eventually, the inter-cluster networking will be automated as well.
export E2EDIR=${E2EDIR:-$HOME/test-infra/e2e}
export LIBDIR=${LIBDIR:-$HOME/test-infra/e2e/lib}
export TESTDIR=${TESTDIR:-$HOME/test-infra/e2e/tests/oai}
./test-infra/e2e/provision/hacks/inter-connect_workers.sh
The output is similar to:
{"workers":["core-md-0-q9mxp-mstdp-6mtvg","edge-md-0-v44mh-pbs9k-t9dq9","regional-md-0-hm5n8-wts7m-5wttp"]}
INFO[0000] Containerlab v0.42.0 started
INFO[0000] Parsing & checking topology file: clab-topo.gotmpl
INFO[0000] Could not read docker config: open /root/.docker/config.json: no such file or directory
INFO[0000] Pulling ghcr.io/nokia/srlinux:22.11.2-116 Docker image
INFO[0049] Done pulling ghcr.io/nokia/srlinux:22.11.2-116
INFO[0049] Creating lab directory: /home/ubuntu/clab-5g
INFO[0049] Creating container: "leaf"
INFO[0072] Creating virtual wire: leaf:e1-3 <--> regional-md-0-hm5n8-wts7m-5wttp:eth1
INFO[0072] Creating virtual wire: leaf:e1-2 <--> edge-md-0-v44mh-pbs9k-t9dq9:eth1
INFO[0072] Creating virtual wire: leaf:e1-1 <--> core-md-0-q9mxp-mstdp-6mtvg:eth1
INFO[0073] Running postdeploy actions for Nokia SR Linux 'leaf' node
INFO[0096] Adding containerlab host entries to /etc/hosts file
INFO[0096] 🎉 New containerlab version 0.49.0 is available! Release notes: https://containerlab.dev/rn/0.49/
Run 'containerlab version upgrade' to upgrade or go check other installation options at https://containerlab.dev/install/
+---+---------------------------------+--------------+-----------------------------------+---------------+---------+----------------+--------------------------+
| # |              Name               | Container ID |               Image               |     Kind      |  State  |  IPv4 Address  |       IPv6 Address       |
+---+---------------------------------+--------------+-----------------------------------+---------------+---------+----------------+--------------------------+
| 1 | core-md-0-q9mxp-mstdp-6mtvg     | 395f25d95545 | kindest/node:v1.26.3              | ext-container | running | 172.18.0.11/16 | fc00:f853:ccd:e793::b/64 |
| 2 | edge-md-0-v44mh-pbs9k-t9dq9     | f5e045bacb1d | kindest/node:v1.26.3              | ext-container | running | 172.18.0.10/16 | fc00:f853:ccd:e793::a/64 |
| 3 | regional-md-0-hm5n8-wts7m-5wttp | 68e86f594ae0 | kindest/node:v1.26.3              | ext-container | running | 172.18.0.9/16  | fc00:f853:ccd:e793::9/64 |
| 4 | net-5g-leaf                     | 297a422aa608 | ghcr.io/nokia/srlinux:22.11.2-116 | srl           | running | 172.18.0.12/16 | fc00:f853:ccd:e793::c/64 |
+---+---------------------------------+--------------+-----------------------------------+---------------+---------+----------------+--------------------------+
You will also need to configure the nodes for the VLANs. Again, this will be automated in a future release that addresses node setup and inter-cluster networking. For now, you must run a script that creates them in each of the worker nodes.
./test-infra/e2e/provision/hacks/vlan-interfaces.sh
Finally, you want to configure the resource backend to be aware of these clusters. The resource backend is an IP address and VLAN index management system. It is included for demonstration purposes to show how Nephio package specialization can interact with external systems to fully configure packages. But it needs to be configured to match our topology.
First, you will apply a package to define the high-level networks for attaching our workloads. The Nephio package specialization pipeline will determine the exact VLAN tags and IP addresses for those attachments based on the specific clusters. There is a predefined PackageVariant in the tests directory for this:
kubectl apply -f test-infra/e2e/tests/oai/001-network.yaml
The output is similar to:
packagevariant.config.porch.kpt.dev/network created
Then you will create appropriate Secret to make sure that Nephio can authenticate to the external backend.
kubectl apply -f test-infra/e2e/tests/oai/001-secret.yaml
The output is similar to:
secret/srl.nokia.com created
The predefined PackageVariant package defines certain resources that exist for the entire topology. However, you also need to configure the resource backend for our particular topology. This will likely be automated in the future, but for now you can just directly apply the configuration you have created that matches this test topology. Within this step also the credentials and information is provided to configure the network device, that aligns with the topology.
./test-infra/e2e/provision/hacks/network-topo.sh
The output is similar to:
rawtopology.topo.nephio.org/nephio created
It might take a couple of seconds for the networks to come up. To list the networks you can use the below command
kubectl get networks.infra.nephio.org
Wait for the the output to be similar as below:
NAME           READY
vpc-cu-e1      True
vpc-cudu-f1    True
vpc-internal   True
vpc-internet   True
vpc-ran        True
After the networks are successfully configured lets configure metallb ip-address pool for each workload cluster. Some workloads in the workload cluster require metallb to expose their services.
./test-infra/e2e/tests/oai/001b-infra-metal-lb.sh
The output is similar to:
12:47:00 - INFO: looking for packagerev default/mgmt-staging-7ad404ab9e0e02af747501c6ce9c2c183d02694b using /home/ubuntu/.kube/config
12:47:00 - INFO: found packagerev default/mgmt-staging-7ad404ab9e0e02af747501c6ce9c2c183d02694b using /home/ubuntu/.kube/config
[RUNNING] "gcr.io/kpt-fn/search-replace:v0.2"
[PASS] "gcr.io/kpt-fn/search-replace:v0.2" in 2.8s
  Results:
    [info] spec.addresses[0]: Mutated field value to "172.18.16.0/20"
[RUNNING] "gcr.io/kpt-fn/set-annotations:v0.1.4"
[PASS] "gcr.io/kpt-fn/set-annotations:v0.1.4" in 4.6s
mgmt-staging-7ad404ab9e0e02af747501c6ce9c2c183d02694b pushed
mgmt-staging-7ad404ab9e0e02af747501c6ce9c2c183d02694b proposed
packagerevision.porch.kpt.dev/mgmt-staging-7ad404ab9e0e02af747501c6ce9c2c183d02694b condition met
12:47:14 - INFO: approving package mgmt-staging-7ad404ab9e0e02af747501c6ce9c2c183d02694b update
mgmt-staging-7ad404ab9e0e02af747501c6ce9c2c183d02694b approved
12:47:16 - INFO: approved package mgmt-staging-7ad404ab9e0e02af747501c6ce9c2c183d02694b update
packagerevision.porch.kpt.dev/mgmt-staging-7ad404ab9e0e02af747501c6ce9c2c183d02694b condition met
12:47:16 - INFO: published package mgmt-staging-7ad404ab9e0e02af747501c6ce9c2c183d02694b update
~
12:47:19 - INFO: looking for packagerev default/mgmt-staging-f1b8e75b6c87549d67037f784abc0083ac601722 using /home/ubuntu/.kube/config
12:47:19 - INFO: found packagerev default/mgmt-staging-f1b8e75b6c87549d67037f784abc0083ac601722 using /home/ubuntu/.kube/config
[RUNNING] "gcr.io/kpt-fn/search-replace:v0.2"
[PASS] "gcr.io/kpt-fn/search-replace:v0.2" in 800ms
  Results:
    [info] spec.addresses[0]: Mutated field value to "172.18.48.0/20"
[RUNNING] "gcr.io/kpt-fn/set-annotations:v0.1.4"
[PASS] "gcr.io/kpt-fn/set-annotations:v0.1.4" in 1.4s
mgmt-staging-f1b8e75b6c87549d67037f784abc0083ac601722 pushed
mgmt-staging-f1b8e75b6c87549d67037f784abc0083ac601722 proposed
packagerevision.porch.kpt.dev/mgmt-staging-f1b8e75b6c87549d67037f784abc0083ac601722 condition met
12:47:25 - INFO: approving package mgmt-staging-f1b8e75b6c87549d67037f784abc0083ac601722 update
mgmt-staging-f1b8e75b6c87549d67037f784abc0083ac601722 approved
12:47:26 - INFO: approved package mgmt-staging-f1b8e75b6c87549d67037f784abc0083ac601722 update
packagerevision.porch.kpt.dev/mgmt-staging-f1b8e75b6c87549d67037f784abc0083ac601722 condition met
12:47:27 - INFO: published package mgmt-staging-f1b8e75b6c87549d67037f784abc0083ac601722 update
~
Step 3: Deploy Dependencies, MySQL database, OAI Core and RAN Operator in the Workload clusters
Now you will need to deploy the MySQL database required by OAI UDR network function, OAI Core and RAN operators across the Workload clusters. To do this, you use PackageVariant and PackageVariantSet. Later uses an objectSelector to select the WorkloadCluster resources previously added to the Management cluster when you had deployed the nephio-workload-cluster packages (manually as well as via PackageVariantSet).
kubectl apply -f test-infra/e2e/tests/oai/002-database.yaml
kubectl apply -f test-infra/e2e/tests/oai/002-operators.yaml
The output is similar to:
packagevariantset.config.porch.kpt.dev/oai-common created
packagevariant.config.porch.kpt.dev/oai-cp-operators created
packagevariant.config.porch.kpt.dev/oai-up-operators created
packagevariant.config.porch.kpt.dev/oai-ran-operator-edge created
packagevariant.config.porch.kpt.dev/oai-ran-operator-regional created
Step 4: Check Database and Operator Deployment
Within five minutes of applying the RAN, Core Operator, and database Packages, you should see oai-core and oai-cn-operators namespaces on the Core workload cluster, :
kubectl get ns --context core-admin@core
The output is similar to:
kubectl get ns --context core-admin@core
NAME                           STATUS   AGE
config-management-monitoring   Active   89m
config-management-system       Active   89m
default                        Active   90m
kube-node-lease                Active   90m
kube-public                    Active   90m
kube-system                    Active   90m
local-path-storage             Active   89m
metallb-system                 Active   89m
oai-cn-operators               Active   5m
oai-core                       Active   5m39s
resource-group-system          Active   88m
In the namespace oai-core you can check MySQL pod
kubectl get pods -n oai-core --context core-admin@core
The output is similar to:
NAME                     READY   STATUS    RESTARTS   AGE
mysql-7dd4cc6945-lqwcv   1/1     Running   0          7m12s
In the oai-cn-operators namespace you should see control plane network function operators
kubectl get pods -n oai-cn-operators --context core-admin@core
The output is similar to:
NAME                                 READY   STATUS    RESTARTS   AGE
oai-amf-operator-7cfcfdcf8f-m5b4h    1/1     Running   0          11m
oai-ausf-operator-746b56b745-zdfmc   1/1     Running   0          11m
oai-nrf-operator-57bc444f87-94x78    1/1     Running   0          11m
oai-smf-operator-5874557bb9-kbp4t    1/1     Running   0          11m
oai-udm-operator-6b4658b9c-nnnb7     1/1     Running   0          11m
oai-udr-operator-85464c47c9-wjprf    1/1     Running   0          11m
In regional and edge clusters you should see below namespaces,
kubectl get ns --context regional-admin@regional
The output is similar to:
NAME                           STATUS   AGE
config-management-monitoring   Active   98m
config-management-system       Active   98m
default                        Active   99m
kube-node-lease                Active   99m
kube-public                    Active   99m
kube-system                    Active   99m
local-path-storage             Active   98m
metallb-system                 Active   98m
oai-ran-operators              Active   14m
resource-group-system          Active   97m
kubectl get ns --context edge-admin@edge
The output is similar to:
NAME                           STATUS   AGE
config-management-monitoring   Active   98m
config-management-system       Active   98m
default                        Active   99m
kube-node-lease                Active   99m
kube-public                    Active   99m
kube-system                    Active   99m
local-path-storage             Active   98m
metallb-system                 Active   98m
oai-cn-operators               Active   14m
oai-ran-operators              Active   14m
resource-group-system          Active   97m
In edge cluster in oai-cn-operators namespace you will see only oai-upf network function.
kubectl get pods -n oai-cn-operators --context edge-admin@edge
The output is similar to:
NAME                                READY   STATUS    RESTARTS   AGE
oai-upf-operator-75cbc869cb-67lf9   1/1     Running   0          16m
Step 5: Deploy the Core Network Functions
You can start by deploying the core network functions which the operator will instantiate. For now, you will use individual PackageVariants targeting the Core and Edge cluster. In the future, you could put all of these resources into
yet-another-package - a “topology” package - and deploy them all as a unit. Or you can use a topology controller to create them. But for now, let’s do each manually.
kubectl create -f test-infra/e2e/tests/oai/003-core-network.yaml
The output is similar to:
packagevariant.config.porch.kpt.dev/oai-nrf created
packagevariant.config.porch.kpt.dev/oai-udm created
packagevariant.config.porch.kpt.dev/oai-ausf created
packagevariant.config.porch.kpt.dev/oai-udr created
packagevariant.config.porch.kpt.dev/oai-amf created
packagevariant.config.porch.kpt.dev/oai-smf created
packagevariant.config.porch.kpt.dev/oai-upf-edge created
All the NFs will wait for NRF to come up and then they will register to NRF. SMF has a dependency on UPF which is described by dependency.yaml file in SMF package. It will wait till the time UPF is deployed. It takes around ~800 seconds for the whole core network to come up. NRF is exposing its service via metallb external ip-address. In case metallb ip-address pool is not properly defined in the previous section, then UPF will not be able to register to NRF and in this case SMF and UPF will not be able to communicate.
Check Core Network Deployment
You can check if all the control plane network functions are up and running
kubectl get pods -n oai-core --context core-admin@core
The output is similar to:
NAME                        READY   STATUS    RESTARTS   AGE
amf-core-84b5cf67c7-7lzs5   1/1     Running   0          42m
ausf-core-7885cb865-pw525   1/1     Running   0          52m
mysql-7dd4cc6945-6pqmm      1/1     Running   0          75m
nrf-core-d4f69557d-5jb88    1/1     Running   0          52m
smf-core-68c4c76bbf-95v9z   1/1     Running   0          31m
udm-core-c7d67cb4d-wdvjx    1/1     Running   0          52m
udr-core-69c56bcbd5-sf8nc   1/1     Running   0          52m
The user plane network function UPF will be deployed on the Edge cluster
kubectl get pods -n oai-core --context edge-admin@edge
The output is similar to:
NAME                        READY   STATUS    RESTARTS   AGE
upf-edge-55ccb4f9d7-868k6   1/1     Running   0          30m
To verify that UPF and SMF are sharing PFCP heartbeats you can run the below commands
kubectl logs -n oai-core --context=edge-admin@edge -l workload.nephio.org/oai=upf --tail=20
The output is similar to:
* Connection state changed (HTTP/2 confirmed)
* Copying HTTP/2 data in stream buffer to connection buffer after upgrade: len=0
* Using Stream ID: 1 (easy handle 0x622000382900)
> PATCH /nnrf-nfm/v1/nf-instances/59826e93-7365-4e6b-b94d-2c5636994825 HTTP/2
Host: 172.18.31.200
accept: */*
content-type: application/json
content-length: 58

* We are completely uploaded and fine
[2024-01-25 16:54:21.799] [upf_app] [info] Response from NRF, HTTP Code: 204
< HTTP/2 204
< date: Thu, 25 Jan 2024 16:54:21 GMT
< content-type: application/json
< location: 192.168.1.21/nnrf-nfm/v1/nf-instances/59826e93-7365-4e6b-b94d-2c5636994825
<
* Connection #0 to host 172.18.31.200 left intact
[2024-01-25 16:54:21.799] [upf_app] [info] Got successful response from NRF
[2024-01-25 16:54:21.817] [upf_n4 ] [info] handle_receive(16 bytes)
[2024-01-25 16:54:21.817] [upf_n4 ] [info] Received SX HEARTBEAT REQUEST
In the logs you should see Received SX HEARTBEAT REQUEST statement. If that is present then SMF and UPF are sharing PFCP heartbeats.
Step 6: Deploy RAN Network Functions
If the core network functions are running and configured properly then you can start by deploying RAN network function PackageVariants.
kubectl create -f test-infra/e2e/tests/oai/004-ran-network.yaml
The output is similar to:
packagevariant.config.porch.kpt.dev/oai-cucp created
packagevariant.config.porch.kpt.dev/oai-du created
packagevariant.config.porch.kpt.dev/oai-cuup created
Wait for ~1500 seconds for the RAN network functions to come up.
Check RAN Deployment
You can check if the deployment of RAN components, CU-CP in Regional cluster and CU-UP and DU in Edge cluster respectively.
kubectl get pods -n oai-ran-cucp --context regional-admin@regional
The output is similar to:
NAME                             READY   STATUS    RESTARTS   AGE
oai-gnb-cu-cp-588f76c5f9-9fp54   1/1     Running   0          10m
kubectl get pods -n oai-ran-cuup --context edge-admin@edge
The output is similar to:
NAME                             READY   STATUS    RESTARTS   AGE
oai-gnb-cu-up-75475f949b-j6chc   1/1     Running   0          9m
kubectl get pods -n oai-ran-du --context edge-admin@edge
The output is similar to:
NAME                          READY   STATUS    RESTARTS   AGE
oai-gnb-du-6cb4cc5fcd-zvlrq   1/1     Running   0          9m
To check that RAN network functions are properly deployed it is important to check if N2, E1 and F1 links are created.
To verify E1 link between CU-CP and CU-UP is properly configured you can run the below commands
kubectl logs -n oai-ran-cucp --context=regional-admin@regional -l app.kubernetes.io/name=oai-gnb-cu-cp --tail=-1 | grep "Accepting new CU-UP ID"
The output is similar to:
7792.449954 [NR_RRC] I Accepting new CU-UP ID 3584 name oai-cu-up (assoc_id 8)
To verify F1 link between CU-CP and DU is properly configured you can run the below commands
kubectl logs -n oai-ran-cucp --context=regional-admin@regional -l app.kubernetes.io/name=oai-gnb-cu-cp --tail=-1 | grep "DU uses RRC version"
The output is similar to:
7424.185965 [RRC] I DU uses RRC version 17.3.0
To verify N2 link between AMF and CU-CP is properly configured you can run the below commands
kubectl logs -n oai-ran-cucp --context=regional-admin@regional -l app.kubernetes.io/name=oai-gnb-cu-cp --tail=-1 | grep "Received NGAP_REGISTER_GNB_CNF: associated AMF"
The output is similar to:
9496.571150 [GNB_APP] I [gNB 0] Received NGAP_REGISTER_GNB_CNF: associated AMF 1
Step 7: Deploy UE
If all three links are configured then you can proceed with deploying the UE PackageVariants
kubectl create -f test-infra/e2e/tests/oai/005-ue.yaml
The output is similar to:
packagevariant.config.porch.kpt.dev/oai-ue created
The UE will be deployed in the Edge cluster in ~300 seconds. To verify that the UE is deployed you can use the below command
kubectl get pods -n oai-ue --context edge-admin@edge
The output is similar to:
NAME                         READY   STATUS    RESTARTS   AGE
oai-nr-ue-78846cf68c-rxkkz   1/1     Running   0          32m
To verify if the UE is successfully connected you can use the below command
UE_POD=$(kubectl get pods -n oai-ue --context edge-admin@edge  -l app.kubernetes.io/name=oai-nr-ue -o jsonpath='{.items[*].metadata.name}')
kubectl logs -n oai-ue $UE_POD -c nr-ue --context edge-admin@edge | grep "REGISTRATION ACCEPT"
kubectl logs -n oai-ue $UE_POD -c nr-ue --context edge-admin@edge | grep "Interface oaitun_ue1 successfully configured"
The output is similar to:
24908.869517 [NAS] I [UE] Received REGISTRATION ACCEPT message
24910.122107 [OIP] I Interface oaitun_ue1 successfully configured, ip address 10.2.0.2, mask 255.255.255.0 broadcast address 10.2.0.255
Step 8: Test the End to End Connectivity
To perform the end to end connectivity test you can ping from the UE to the UPF.
UE_POD=$(kubectl get pods -n oai-ue --context edge-admin@edge  -l app.kubernetes.io/name=oai-nr-ue -o jsonpath='{.items[*].metadata.name}')
UPF_POD=$(kubectl get pods -n oai-core --context=edge-admin@edge -l workload.nephio.org/oai=upf -o jsonpath='{.items[*].metadata.name}')
UPF_tun0_IP_ADDR=$(kubectl exec -it $UPF_POD -n oai-core -c upf-edge --context edge-admin@edge -- ip -f inet addr show tun0 | sed -En -e 's/.*inet ([0-9.]+).*/\1/p')
kubectl exec -it $UE_POD -n oai-ue --context edge-admin@edge -- ping -I oaitun_ue1 -c 3 $UPF_tun0_IP_ADDR
The output is similar to:
PING 10.2.0.1 (10.2.0.1) from 10.2.0.2 oaitun_ue1: 56(84) bytes of data.
64 bytes from 10.2.0.1: icmp_seq=1 ttl=64 time=10.9 ms
64 bytes from 10.2.0.1: icmp_seq=2 ttl=64 time=12.1 ms
64 bytes from 10.2.0.1: icmp_seq=3 ttl=64 time=11.3 ms

--- 10.2.0.1 ping statistics ---
3 packets transmitted, 3 received, 0% packet loss, time 2002ms
rtt min/avg/max/mdev = 10.869/11.435/12.093/0.503 ms
For now the extra interfaces which are created using inter-connectivity script does not perform natting to have internet access.