Free5GC Testbed Deployment and E2E testing with UERANSIM
Introduction
Be sure you have followed the installation guide before trying these exercises.
These exercises will take you from a system with only the Nephio Management cluster setup to a deployment with:
-
A Regional cluster
-
Two Edge clusters
-
Repositories for each cluster, registered with Nephio, and with Config Sync set up to pull from those repositories.
-
Inter-cluster networking between those clusters
-
A complete free5GC deployment including:
- AUSF, NRF, NSSF, PCF, UDM, UDR running on the Regional cluster and communicating via the Kubernetes default network
- SMF, AMF running on the Regional cluster and attached to the secondary Multus networks as needed
- UPF running on the Edge clusters and attached to the secondary Multus networks as needed
- The free5GC WebUI and MongoDB as supporting services
-
A registered subscriber in the free5GC core
-
UERANSIM running on the edge01 cluster and simulating a gNB and the subscriber’s UE
The network configuration is illustrated in the following figure:
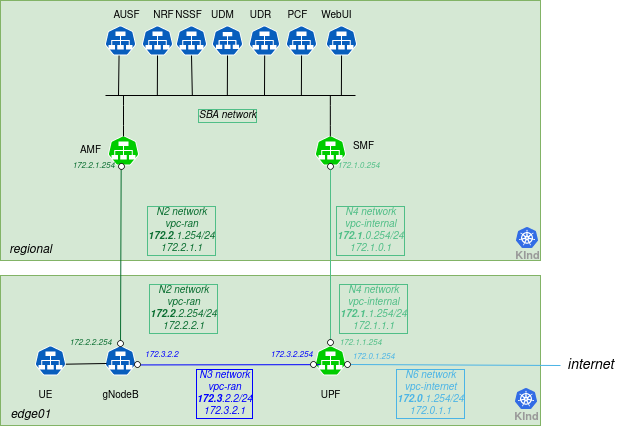
Note
For simplicity, only one edge cluster is represented.Additionally, you can use Nephio to change the capacity requirement for the UPF and SMF NFs and see how the free5GC operator translates that into increased memory and CPU requirements for the underlying workload.
To perform these exercises, you will need:
- Access to the installed demo VM environment and can login as the
ubuntuuser to have access to the necessary files. - Access to the Nephio UI as described in the installation guide
Access to Gitea, used in the demo environment as the Git provider, is optional. Later in the exercises, you will also access the free5GC Web UI.
Step 1: Create the Regional cluster
Our e2e topology consists of one Regional cluster, and two Edge clusters. Let’s start by deploying the Regional cluster. In this case, you will use manual kpt commands to deploy a single cluster. First, check to make sure that both the mgmt and mgmt-staging repositories are in the Ready state. The mgmt repository is used to manage the contents of the Management cluster via Nephio; the mgmt-staging repository is just used internally during the cluster bootstrapping process.
Use the session just started on the VM to run these commands:
Note
After freshdocker install, verify docker supplementary group is loaded by executing id | grep docker.
If not, logout and login to the VM or execute the newgrp docker to ensure the docker supplementary group is loaded.
kubectl get repositories
The output is similar to:
NAME                        TYPE   CONTENT   DEPLOYMENT   READY   ADDRESS
catalog-distros-sandbox     git    Package   false        True    https://github.com/nephio-project/catalog.git
catalog-infra-capi          git    Package   false        True    https://github.com/nephio-project/catalog.git
catalog-nephio-core         git    Package   false        True    https://github.com/nephio-project/catalog.git
catalog-nephio-optional     git    Package   false        True    https://github.com/nephio-project/catalog.git
catalog-workloads-free5gc   git    Package   false        True    https://github.com/nephio-project/catalog.git
catalog-workloads-oai-ran   git    Package   false        True    https://github.com/nephio-project/catalog.git
catalog-workloads-tools     git    Package   false        True    https://github.com/nephio-project/catalog.git
mgmt                        git    Package   true         True    http://172.18.0.200:3000/nephio/mgmt.git
mgmt-staging                git    Package   false        True    http://172.18.0.200:3000/nephio/mgmt-staging.git
oai-core-packages           git    Package   false        True    https://github.com/OPENAIRINTERFACE/oai-packages.git
Since those are Ready, you can deploy a package from the
catalog-infra-capi repository into the mgmt
repository. To do this, you retrieve the Package Revision name using porchctl rpkg get, clone that specific Package
Revision via the porchctl rpkg clone command, then propose and approve the resulting package revision. You want to
use the latest revision of the nephio-workload-cluster package, which you can get with the command below (your latest
revision may be different):
porchctl rpkg get --name nephio-workload-cluster
The output is similar to:
NAME                                                          PACKAGE                   WORKSPACENAME   REVISION   LATEST   LIFECYCLE   REPOSITORY
catalog-infra-capi-d4d7d55835a5578f5c43fc8244deb6a091a8643f   nephio-workload-cluster   main            main       false    Published   catalog-infra-capi
catalog-infra-capi-b0ae9512aab3de73bbae623a3b554ade57e15596   nephio-workload-cluster   v2.0.0          v2.0.0     true     Published   catalog-infra-capi
Then, use the NAME from that in the clone operation, and the resulting PackageRevision name to perform the propose
and approve operations:
porchctl rpkg clone -n default catalog-infra-capi-b0ae9512aab3de73bbae623a3b554ade57e15596 --repository mgmt regional
The output is similar to:
mgmt-08c26219f9879acdefed3469f8c3cf89d5db3868 created
Next, you will want to ensure that the new Regional cluster is labeled as regional. Since you are using the CLI, you
will need to pull the package out, modify it, and then push the updates back to the Draft revision. You will use kpt
and the set-labels function to do this.
To pull the package to a local directory, use the rpkg pull command:
porchctl rpkg pull -n default mgmt-08c26219f9879acdefed3469f8c3cf89d5db3868 regional
The package is now in the regional directory. So you can execute the set-labels function against the package
imperatively, using kpt fn eval:
kpt fn eval --image gcr.io/kpt-fn/set-labels:v0.2.0 regional -- "nephio.org/site-type=regional" "nephio.org/region=us-west1"
The output is similar to:
[RUNNING] "gcr.io/kpt-fn/set-labels:v0.2.0"
[PASS] "gcr.io/kpt-fn/set-labels:v0.2.0" in 2.6s
  Results:
    [info]: set 22 labels in total
If you wanted to, you could have used the --save option to add the set-labels call to the package pipeline. This
would mean that function gets called whenever the server saves the package. If you added new resources later, they would
also get labeled.
In any case, you now can push the package with the labels applied back to the repository:
porchctl rpkg push -n default mgmt-08c26219f9879acdefed3469f8c3cf89d5db3868 regional
The output is similar to:
[RUNNING] "gcr.io/kpt-fn/apply-replacements:v0.1.1"
[PASS] "gcr.io/kpt-fn/apply-replacements:v0.1.1"
Finally, you propose and approve the package.
porchctl rpkg propose -n default mgmt-08c26219f9879acdefed3469f8c3cf89d5db3868
The output is similar to:
mgmt-08c26219f9879acdefed3469f8c3cf89d5db3868 proposed
porchctl rpkg approve -n default mgmt-08c26219f9879acdefed3469f8c3cf89d5db3868
The output is similar to:
mgmt-08c26219f9879acdefed3469f8c3cf89d5db3868 approved
ConfigSync running in the Management cluster will now pull out this new package, create all the resources necessary to provision a KinD cluster, and register it with Nephio. This will take about five minutes or so.
Step 2: Check the Regional cluster installation
You can check if the cluster has been added to the management cluster:
kubectl get cl
or
kubectl get clusters.cluster.x-k8s.io
The output is similar to:
NAME       PHASE         AGE     VERSION
regional   Provisioned   52m     v1.26.3
To access the API server of that cluster, you need to retrieve the kubeconfig file by pulling it from the Kubernetes
Secret and decode the base64 encoding:
kubectl get secret regional-kubeconfig -o jsonpath='{.data.value}' | base64 -d > $HOME/.kube/regional-kubeconfig
export KUBECONFIG=$HOME/.kube/config:$HOME/.kube/regional-kubeconfig
You can then use it to access the Workload cluster directly:
kubectl get ns --context regional-admin@regional
The output is similar to:
NAME                           STATUS   AGE
config-management-monitoring   Active   142m
config-management-system       Active   142m
default                        Active   142m
kube-node-lease                Active   142m
kube-public                    Active   142m
kube-system                    Active   142m
local-path-storage             Active   141m
metallb-system                 Active   142m
resource-group-system          Active   140m
You should also check that the KinD cluster has come up fully with kubectl get machinesets. You should see READY and
AVAILABLE replicas.
kubectl get machinesets
The output is similar to:
NAME                        CLUSTER    REPLICAS   READY   AVAILABLE   AGE     VERSION
regional-md-0-m6cr5-wtzlx   regional   1          1       1           5m36s   v1.26.3
Step 3: Deploy two Edge clusters
Next, you can deploy two Edge clusters by applying the PackageVariantSet that can be found in the tests directory:
kubectl apply -f test-infra/e2e/tests/free5gc/002-edge-clusters.yaml
The output is similar to:
packagevariantset.config.porch.kpt.dev/edge-clusters created
You should also check that the KinD cluster has come up fully with kubectl get machinesets. You should see READY and
AVAILABLE replicas.
kubectl get machinesets
The output is similar to:
NAME                        CLUSTER    REPLICAS   READY   AVAILABLE   AGE    VERSION
edge01-md-0-rts82-q2vkr     edge01     1          1       1           104m   v1.26.3
edge02-md-0-kwn67-74tpw     edge02     1          1       1           104m   v1.26.3
regional-md-0-lvmvm-8msw6   regional   1          1       1           143m   v1.26.3
This is equivalent to doing the same kpt commands used earlier for the Regional cluster, except that it uses the
PackageVariantSet controller, which is running in the Nephio Management cluster. It will clone the package for each
entry in the field packageNames in the PackageVariantSet. You can observe the progress by looking at the UI, or by
using kubectl to monitor the various package variants, package revisions, and KinD clusters.
To access the API server of these clusters, you will need to get the kubeconfig file. To retrieve the file, you pull
it from the Kubernetes Secret and decode the base64 encoding:
kubectl get secret edge01-kubeconfig -o jsonpath='{.data.value}' | base64 -d > $HOME/.kube/edge01-kubeconfig
kubectl get secret edge02-kubeconfig -o jsonpath='{.data.value}' | base64 -d > $HOME/.kube/edge02-kubeconfig
export KUBECONFIG=$HOME/.kube/config:$HOME/.kube/regional-kubeconfig:$HOME/.kube/edge01-kubeconfig:$HOME/.kube/edge02-kubeconfig
To retain the KUBECONFIG environment variable permanently across sessions for the
user, add it to the ~/.bash_profile and source the ~/.bash_profile file
echo "export KUBECONFIG=$HOME/.kube/config:$HOME/.kube/regional-kubeconfig:$HOME/.kube/edge01-kubeconfig:$HOME/.kube/edge02-kubeconfig" >> ~/.bash_profile
source ~/.bash_profile
Once the Edge clusters are ready, it is necessary to connect them. For now you are using the containerlab tool. Eventually, the inter-cluster networking will be automated as well.
export E2EDIR=${E2EDIR:-$HOME/test-infra/e2e}
export LIBDIR=${LIBDIR:-$HOME/test-infra/e2e/lib}
export TESTDIR=${TESTDIR:-$HOME/test-infra/e2e/tests/free5gc}
./test-infra/e2e/provision/hacks/inter-connect_workers.sh
The output is similar to:
{"workers":["edge01-md-0-rts82-q2vkr-7cw86","edge02-md-0-kwn67-74tpw-v6x96","regional-md-0-lvmvm-8msw6-r67f6"]}
INFO[0000] Containerlab v0.42.0 started
INFO[0000] Parsing & checking topology file: clab-topo.gotmpl
INFO[0000] Could not read docker config: open /root/.docker/config.json: no such file or directory
INFO[0000] Pulling ghcr.io/nokia/srlinux:22.11.2-116 Docker image
INFO[0046] Done pulling ghcr.io/nokia/srlinux:22.11.2-116
INFO[0046] Creating lab directory: /home/ubuntu/test-infra/e2e/tests/free5gc/clab-5g
INFO[0046] Creating container: "leaf"
INFO[0074] Creating virtual wire: leaf:e1-2 <--> edge02-md-0-kwn67-74tpw-v6x96:eth1
INFO[0074] Creating virtual wire: leaf:e1-1 <--> edge01-md-0-rts82-q2vkr-7cw86:eth1
INFO[0074] Creating virtual wire: leaf:e1-3 <--> regional-md-0-lvmvm-8msw6-r67f6:eth1
INFO[0074] Running postdeploy actions for Nokia SR Linux 'leaf' node
INFO[0097] Adding containerlab host entries to /etc/hosts file
INFO[0097] 🎉 New containerlab version 0.49.0 is available! Release notes: https://containerlab.dev/rn/0.49/
Run 'containerlab version upgrade' to upgrade or go check other installation options at https://containerlab.dev/install/
+---+---------------------------------+--------------+-----------------------------------+---------------+---------+----------------+--------------------------+
| # |              Name               | Container ID |               Image               |     Kind      |  State  |  IPv4 Address  |       IPv6 Address       |
+---+---------------------------------+--------------+-----------------------------------+---------------+---------+----------------+--------------------------+
| 1 | edge01-md-0-rts82-q2vkr-7cw86   | 6e36e2cfb143 | kindest/node:v1.26.3              | ext-container | running | 172.18.0.8/16  | fc00:f853:ccd:e793::8/64 |
| 2 | edge02-md-0-kwn67-74tpw-v6x96   | 83ae8118b520 | kindest/node:v1.26.3              | ext-container | running | 172.18.0.11/16 | fc00:f853:ccd:e793::b/64 |
| 3 | regional-md-0-lvmvm-8msw6-r67f6 | 60a6efe0f86f | kindest/node:v1.26.3              | ext-container | running | 172.18.0.5/16  | fc00:f853:ccd:e793::5/64 |
| 4 | net-5g-leaf                     | 402cecf6061c | ghcr.io/nokia/srlinux:22.11.2-116 | srl           | running | 172.18.0.12/16 | fc00:f853:ccd:e793::c/64 |
+---+---------------------------------+--------------+-----------------------------------+---------------+---------+----------------+--------------------------+
You will also need to configure the nodes for the VLANs. Again, this will be automated in a future release that addresses node setup and inter-cluster networking. For now, you must run a script that creates them in each of the worker nodes.
./test-infra/e2e/provision/hacks/vlan-interfaces.sh
Finally, you want to configure the resource backend to be aware of these clusters. The resource backend is an IP address and VLAN index management system. It is included for demonstration purposes to show how Nephio package specialization can interact with external systems to fully configure packages. But it needs to be configured to match our topology.
First, you will apply a package to define the high-level networks for attaching our workloads. The Nephio package specialization pipeline will determine the exact VLAN tags and IP addresses for those attachments based on the specific clusters. There is a predefined PackageVariant in the tests directory for this:
kubectl apply -f test-infra/e2e/tests/free5gc/002-network.yaml
The output is similar to:
packagevariant.config.porch.kpt.dev/network created
Then you will create appropriate Secret to make sure that Nephio can authenticate to the external backend.
kubectl apply -f test-infra/e2e/tests/free5gc/002-secret.yaml
The output is similar to:
secret/srl.nokia.com created
The predefined PackageVariant package defines certain resources that exist for the entire topology. However, you also need to configure the resource backend for our particular topology. This will likely be automated in the future, but for now you can just directly apply the configuration you have created that matches this test topology. Within this step also the credentials and information is provided to configure the network device, that aligns with the topology.
./test-infra/e2e/provision/hacks/network-topo.sh
The output is similar to:
rawtopology.topo.nephio.org/nephio created
Step 4: Deploy free5GC Control Plane Functions
While the Edge clusters are deploying (which will take 5-10 minutes), you can install the free5GC functions other than
SMF, AMF, and UPF. For this, you will use the Regional cluster. Since these are all installed with a single package, you
can use the UI to pick the free5gc-cp package from the free5gc-packages repository and clone it to the regional
repository (you could have also used the CLI).
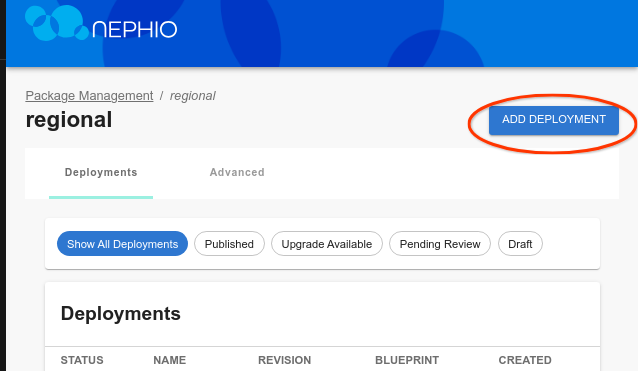
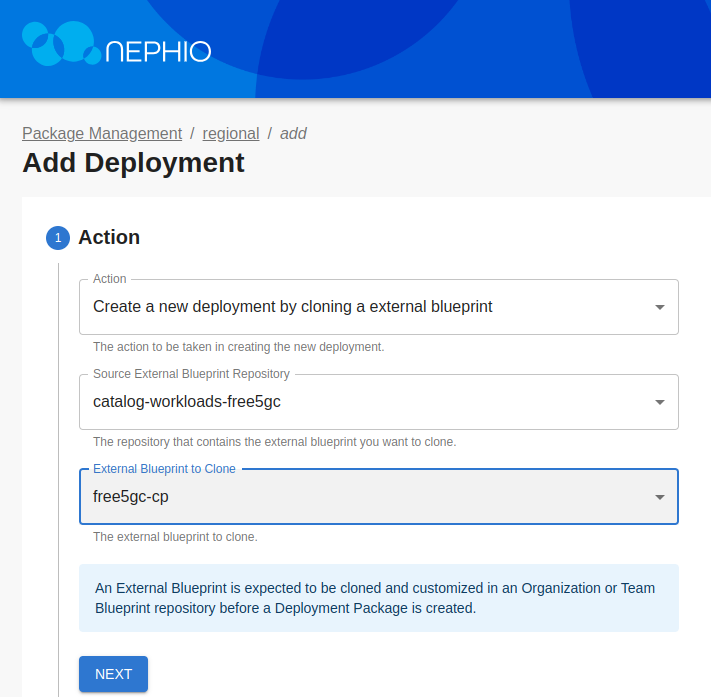
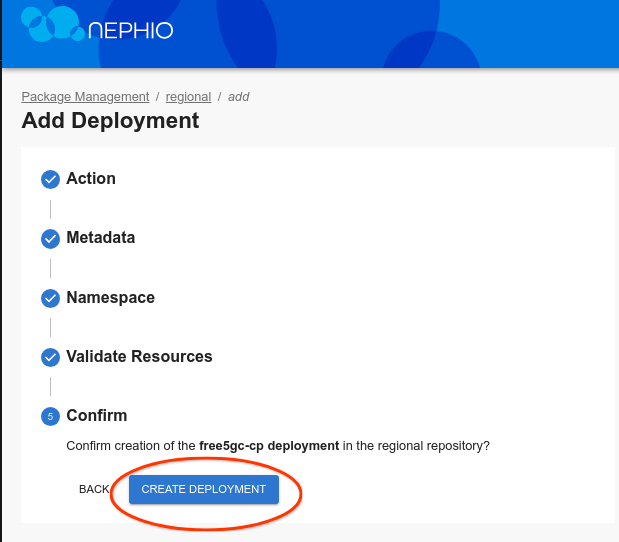
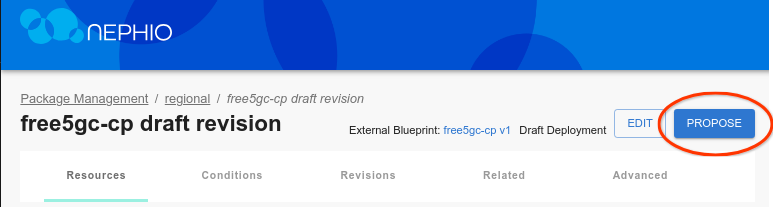
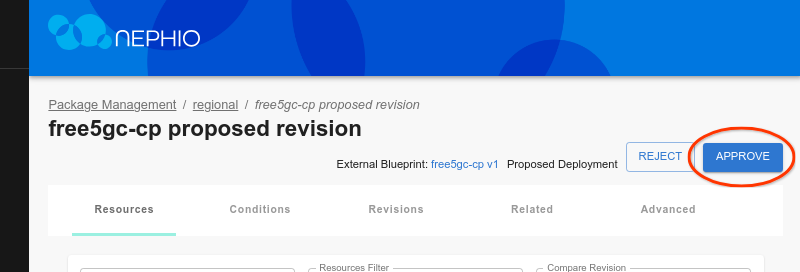
Click through the “Next” button until you are through all the steps, then click “Add Deployment”. On the next screen, click “Propose”, and then “Approve”.
Shortly thereafter, you should see free5GC-cp in the cluster namespace:
kubectl get ns --context regional-admin@regional
The output is similar to:
NAME                           STATUS   AGE
config-management-monitoring   Active   28m
config-management-system       Active   28m
default                        Active   28m
free5gc-cp                     Active   3m16s
kube-node-lease                Active   28m
kube-public                    Active   28m
kube-system                    Active   28m
local-path-storage             Active   28m
resource-group-system          Active   27m
And the actual workload resources:
kubectl -n free5gc-cp get all --context regional-admin@regional
The output is similar to:
NAME                                 READY   STATUS    RESTARTS   AGE
pod/free5gc-ausf-7d494d668d-k55kb    1/1     Running   0          3m31s
pod/free5gc-nrf-66cc98cfc5-9mxqm     1/1     Running   0          3m31s
pod/free5gc-nssf-668db85d54-gsnqw    1/1     Running   0          3m31s
pod/free5gc-pcf-55d4bfd648-tk9fs     1/1     Running   0          3m31s
pod/free5gc-udm-845db6c9c8-54tfb     1/1     Running   0          3m31s
pod/free5gc-udr-79466f7f86-wh5bt     1/1     Running   0          3m31s
pod/free5gc-webui-84ff8c456c-g7q44   1/1     Running   0          3m31s
pod/mongodb-0                        1/1     Running   0          3m31s

NAME                    TYPE        CLUSTER-IP       EXTERNAL-IP   PORT(S)          AGE
service/ausf-nausf      ClusterIP   10.131.151.99    <none>        80/TCP           3m32s
service/mongodb         ClusterIP   10.139.208.189   <none>        27017/TCP        3m32s
service/nrf-nnrf        ClusterIP   10.143.64.94     <none>        8000/TCP         3m32s
service/nssf-nnssf      ClusterIP   10.130.139.231   <none>        80/TCP           3m31s
service/pcf-npcf        ClusterIP   10.131.19.224    <none>        80/TCP           3m31s
service/udm-nudm        ClusterIP   10.128.13.118    <none>        80/TCP           3m31s
service/udr-nudr        ClusterIP   10.137.211.80    <none>        80/TCP           3m31s
service/webui-service   NodePort    10.140.177.70    <none>        5000:30500/TCP   3m31s

NAME                            READY   UP-TO-DATE   AVAILABLE   AGE
deployment.apps/free5gc-ausf    1/1     1            1           3m31s
deployment.apps/free5gc-nrf     1/1     1            1           3m31s
deployment.apps/free5gc-nssf    1/1     1            1           3m31s
deployment.apps/free5gc-pcf     1/1     1            1           3m31s
deployment.apps/free5gc-udm     1/1     1            1           3m31s
deployment.apps/free5gc-udr     1/1     1            1           3m31s
deployment.apps/free5gc-webui   1/1     1            1           3m31s

NAME                                       DESIRED   CURRENT   READY   AGE
replicaset.apps/free5gc-ausf-7d494d668d    1         1         1       3m31s
replicaset.apps/free5gc-nrf-66cc98cfc5     1         1         1       3m31s
replicaset.apps/free5gc-nssf-668db85d54    1         1         1       3m31s
replicaset.apps/free5gc-pcf-55d4bfd648     1         1         1       3m31s
replicaset.apps/free5gc-udm-845db6c9c8     1         1         1       3m31s
replicaset.apps/free5gc-udr-79466f7f86     1         1         1       3m31s
replicaset.apps/free5gc-webui-84ff8c456c   1         1         1       3m31s

NAME                       READY   AGE
statefulset.apps/mongodb   1/1     3m31s
Step 5: Deploy free5GC Operator in the Workload clusters
Now you will need to deploy the free5GC operator across all of the Workload clusters (regional and edge). To do this, you use another PackageVariantSet. This one uses an objectSelector to select the WorkloadCluster resources previously added to the Management cluster when you had deployed the nephio-workload-cluster packages (manually as well as via PackageVariantSet).
kubectl apply -f test-infra/e2e/tests/free5gc/004-free5gc-operator.yaml
The output is similar to:
packagevariantset.config.porch.kpt.dev/free5gc-operator created
Step 6: Check free5GC Operator Deployment
Within five minutes of applying the free5GC Operator YAML file, you should see free5gc namespaces on your regional and
edge clusters:
kubectl get ns --context edge01-admin@edge01
The output is similar to:
NAME                           STATUS   AGE
config-management-monitoring   Active   3h46m
config-management-system       Active   3h46m
default                        Active   3h47m
free5gc                        Active   159m
kube-node-lease                Active   3h47m
kube-public                    Active   3h47m
kube-system                    Active   3h47m
resource-group-system          Active   3h45m
kubectl -n free5gc get all --context edge01-admin@edge01
The output is similar to:
NAME                                                          READY   STATUS    RESTARTS   AGE
pod/free5gc-operator-controller-controller-58df9975f4-sglj6   2/2     Running   0          164m

NAME                                                     READY   UP-TO-DATE   AVAILABLE   AGE
deployment.apps/free5gc-operator-controller-controller   1/1     1            1           164m

NAME                                                                DESIRED   CURRENT   READY   AGE
replicaset.apps/free5gc-operator-controller-controller-58df9975f4   1         1         1       164m
Step 7: Deploy the AMF, SMF and UPF NFs
Finally, you can deploy the individual network functions which the operator will instantiate. For now, you will use individual PackageVariants targeting the Regional cluster for each of the AMF and SMF NFs and a PackageVariantSet targeting the Edge clusters for the UPF NFs. In the future, you could put all of these resources into yet-another-package - a “topology” package - and deploy them all as a unit. Or you can use a topology controller to create them. But for now, let’s do each manually.
kubectl apply -f test-infra/e2e/tests/free5gc/005-edge-free5gc-upf.yaml
kubectl apply -f test-infra/e2e/tests/free5gc/006-regional-free5gc-amf.yaml
kubectl apply -f test-infra/e2e/tests/free5gc/006-regional-free5gc-smf.yaml
Free5gc requires that the SMF and AMF NFs be explicitly configured with information about each UPF. Therefore, the AMF and SMF packages will remain in an “unready” state until the UPF packages have all been published.
Check UPF deployment
You can check the UPF logs in edge01 cluster:
UPF1_POD=$(kubectl get pods -n free5gc-upf -l name=upf-edge01 --context edge01-admin@edge01 -o jsonpath='{.items[0].metadata.name}')
kubectl -n free5gc-upf logs $UPF1_POD --context edge01-admin@edge01
The output is similar to:
2023-07-15T09:05:51Z [INFO][UPF][Main] UPF version:
	free5GC version: v3.2.1
	build time:      2023-06-09T16:41:08Z
	commit hash:     4972fffb
	commit time:     2022-06-29T05:46:33Z
	go version:      go1.20.5 linux/amd64
2023-07-15T09:05:51Z [INFO][UPF][Cfg] Read config from [/free5gc/config/upfcfg.yaml]
2023-07-15T09:05:51Z [INFO][UPF][Cfg] ==================================================
2023-07-15T09:05:51Z [INFO][UPF][Cfg] (*factory.Config)(0xc0003c25f0)({
	Version: (string) (len=5) "1.0.3",
	Description: (string) (len=17) "UPF configuration",
	Pfcp: (*factory.Pfcp)(0xc0003d2fc0)({
		Addr: (string) (len=11) "172.1.1.254",
		NodeID: (string) (len=11) "172.1.1.254",
		RetransTimeout: (time.Duration) 1s,
		MaxRetrans: (uint8) 3
	}),
	Gtpu: (*factory.Gtpu)(0xc0003d3170)({
		Forwarder: (string) (len=5) "gtp5g",
		IfList: ([]factory.IfInfo) (len=1 cap=1) {
			(factory.IfInfo) {
				Addr: (string) (len=11) "172.3.0.254",
				Type: (string) (len=2) "N3",
				Name: (string) "",
				IfName: (string) ""
			}
		}
	}),
	DnnList: ([]factory.DnnList) (len=1 cap=1) {
		(factory.DnnList) {
			Dnn: (string) (len=8) "internet",
			Cidr: (string) (len=11) "10.1.0.0/24",
			NatIfName: (string) (len=2) "n6"
		}
	},
	Logger: (*factory.Logger)(0xc000378be0)({
		Enable: (bool) true,
		Level: (string) (len=4) "info",
		ReportCaller: (bool) false
	})
})
2023-07-15T09:05:51Z [INFO][UPF][Cfg] ==================================================
2023-07-15T09:05:51Z [INFO][UPF][Main] Log level is set to [info] level
2023-07-15T09:05:51Z [INFO][UPF][Main] starting Gtpu Forwarder [gtp5g]
2023-07-15T09:05:51Z [INFO][UPF][Main] GTP Address: "172.3.0.254:2152"
2023-07-15T09:05:51Z [INFO][UPF][Buff] buff server started
2023-07-15T09:05:51Z [INFO][UPF][Pfcp][172.1.1.254:8805] starting pfcp server
2023-07-15T09:05:51Z [INFO][UPF][Pfcp][172.1.1.254:8805] pfcp server started
2023-07-15T09:05:51Z [INFO][UPF][Main] UPF started
2023-07-15T09:10:45Z [INFO][UPF][Pfcp][172.1.1.254:8805] handleAssociationSetupRequest
2023-07-15T09:10:45Z [INFO][UPF][Pfcp][172.1.1.254:8805][rNodeID:172.1.0.254] New node
Check AMF deployment
You can check the AMF logs:
AMF_POD=$(kubectl get pods -n free5gc-cp -l name=amf-regional --context regional-admin@regional -o jsonpath='{.items[0].metadata.name}')
kubectl -n free5gc-cp logs $AMF_POD --context regional-admin@regional
The output is similar to:
2023-07-15T09:08:55Z [INFO][AMF][CFG] config version [1.0.3]
2023-07-15T09:08:55Z [INFO][AMF][Init] AMF Log level is set to [info] level
2023-07-15T09:08:55Z [INFO][LIB][NAS] set log level : info
2023-07-15T09:08:55Z [INFO][LIB][NAS] set report call : false
2023-07-15T09:08:55Z [INFO][LIB][NGAP] set log level : info
2023-07-15T09:08:55Z [INFO][LIB][NGAP] set report call : false
2023-07-15T09:08:55Z [INFO][LIB][FSM] set log level : info
2023-07-15T09:08:55Z [INFO][LIB][FSM] set report call : false
2023-07-15T09:08:55Z [INFO][LIB][Aper] set log level : info
2023-07-15T09:08:55Z [INFO][LIB][Aper] set report call : false
2023-07-15T09:08:55Z [INFO][AMF][App] amf
2023-07-15T09:08:55Z [INFO][AMF][App] AMF version:
	free5GC version: v3.2.1
	build time:      2023-06-09T16:40:22Z
	commit hash:     a3bd5358
	commit time:     2022-05-01T14:58:26Z
	go version:      go1.20.5 linux/amd64
2023-07-15T09:08:55Z [INFO][AMF][Init] Server started
2023-07-15T09:08:55Z [INFO][AMF][Util] amfconfig Info: Version[1.0.3] Description[AMF initial local configuration]
2023-07-15T09:08:55Z [INFO][AMF][NGAP] Listen on 172.2.2.254:38412
Check SMF deployment
You can check the SMF logs:
SMF_POD=$(kubectl get pods -n free5gc-cp -l name=smf-regional --context regional-admin@regional -o jsonpath='{.items[0].metadata.name}')
kubectl -n free5gc-cp logs $SMF_POD --context regional-admin@regional
The output is similar to:
2023-07-15T09:10:45Z [INFO][SMF][CFG] SMF config version [1.0.2]
2023-07-15T09:10:45Z [INFO][SMF][CFG] UE-Routing config version [1.0.1]
2023-07-15T09:10:45Z [INFO][SMF][Init] SMF Log level is set to [debug] level
2023-07-15T09:10:45Z [INFO][LIB][NAS] set log level : info
2023-07-15T09:10:45Z [INFO][LIB][NAS] set report call : false
2023-07-15T09:10:45Z [INFO][LIB][NGAP] set log level : info
2023-07-15T09:10:45Z [INFO][LIB][NGAP] set report call : false
2023-07-15T09:10:45Z [INFO][LIB][Aper] set log level : info
2023-07-15T09:10:45Z [INFO][LIB][Aper] set report call : false
2023-07-15T09:10:45Z [INFO][LIB][PFCP] set log level : info
2023-07-15T09:10:45Z [INFO][LIB][PFCP] set report call : false
2023-07-15T09:10:45Z [INFO][SMF][App] smf
2023-07-15T09:10:45Z [INFO][SMF][App] SMF version:
	free5GC version: v3.2.1
	build time:      2023-06-09T16:40:53Z
	commit hash:     de70bf6c
	commit time:     2022-06-28T04:52:40Z
	go version:      go1.20.5 linux/amd64
2023-07-15T09:10:45Z [INFO][SMF][CTX] smfconfig Info: Version[1.0.2] Description[SMF configuration]
2023-07-15T09:10:45Z [INFO][SMF][CTX] Endpoints: [172.3.0.254]
2023-07-15T09:10:45Z [INFO][SMF][CTX] Endpoints: [172.3.1.254]
2023-07-15T09:10:45Z [INFO][SMF][Init] Server started
2023-07-15T09:10:45Z [INFO][SMF][Init] SMF Registration to NRF {7011c946-4ca4-45ff-bac6-32116bd93934 SMF REGISTERED 0 0xc0001da168 0xc0001da198 [] []   [smf-regional] [] <nil> [] [] <nil> 0 0 0 area1 <nil> <nil> <nil> <nil> 0xc0000b81c0 <nil> <nil> <nil> <nil> <nil> map[] <nil> false 0xc0001da060 false false []}
2023-07-15T09:10:45Z [INFO][SMF][PFCP] Listen on 172.1.0.254:8805
2023-07-15T09:10:45Z [INFO][SMF][App] Sending PFCP Association Request to UPF[172.1.1.254]
2023-07-15T09:10:45Z [INFO][LIB][PFCP] Remove Request Transaction [1]
2023-07-15T09:10:45Z [INFO][SMF][App] Received PFCP Association Setup Accepted Response from UPF[172.1.1.254]
2023-07-15T09:10:45Z [INFO][SMF][App] Sending PFCP Association Request to UPF[172.1.2.254]
2023-07-15T09:10:45Z [INFO][LIB][PFCP] Remove Request Transaction [2]
2023-07-15T09:10:45Z [INFO][SMF][App] Received PFCP Association Setup Accepted Response from UPF[172.1.2.254]
Step 8: Deploy UERANSIM
The UERANSIM package can be deployed to the edge01 cluster, where it will simulate a gNodeB and UE. Just like our other packages, UERANSIM needs to be configured to attach to the correct networks and use the correct IP address. Thus, you use our standard specialization techniques and pipeline to deploy UERANSIM, just like the other network functions.
However, before you do that, let us register the UE with free5GC as a subscriber. You will use the free5GC Web UI to do
this. To access it, you need to open another port forwarding session. Assuming you have the regional-kubeconfig file
you created earlier in your home directory, you need to establish another ssh session from your workstation to the VM,
port forwarding port 5000.
Before moving on to the new terminal, let’s copy regional-kubeconfig to the home directory:
cp $HOME/.kube/regional-kubeconfig .
Then, use the same form of the command you did for other sessions. For example, for the generic Ubuntu VM, the command would be:
ssh <user>@<vm-address> \
                -L 5000:localhost:5000 \
                kubectl --kubeconfig regional-kubeconfig \
                port-forward --namespace=free5gc-cp svc/webui-service 5000
You should now be able to navigate to http://localhost:5000/ and access the free5GC WebUI. The test subscriber is the same as the standard free5GC default subscriber. Thus, you can follow the instructions on the free5GC site, but start at Step 4.
Once the subscriber is registered, you can deploy UERANSIM:
kubectl apply -f test-infra/e2e/tests/free5gc/007-edge01-ueransim.yaml
You can check to see if the simulated UE is up and running by checking the UERANSIM deployment. First, you can use the get_capi_kubeconfig` shortcut to retrieve the kubeconfig for the edge01 cluster, and then query that cluster for the UERANSIM pods.
get_capi_kubeconfig edge01
kubectl --kubeconfig edge01-kubeconfig -n ueransim get pod
The output is similar to:
NAME                                  READY   STATUS    RESTARTS   AGE
ueransimgnb-edge01-748b45f684-sbs8h   1/1     Running   0          81m
ueransimue-edge01-56fccbc4b6-h42k7    1/1     Running   0          81m
Let’s see if you can simulate the UE pinging out to our DNN.
UE_POD=$(kubectl --kubeconfig edge01-kubeconfig get pods -n ueransim -l app=ueransim -l component=ue -o jsonpath='{.items[0].metadata.name}')
kubectl --kubeconfig edge01-kubeconfig -n ueransim exec -it $UE_POD -- /bin/bash -c "ping -I uesimtun0 172.0.0.1"
The output is similar to:
PING 172.0.0.1 (172.0.0.1) from 10.1.0.2 uesimtun0: 56(84) bytes of data.
64 bytes from 172.0.0.1: icmp_seq=1 ttl=63 time=7.01 ms
64 bytes from 172.0.0.1: icmp_seq=2 ttl=63 time=6.28 ms
64 bytes from 172.0.0.1: icmp_seq=3 ttl=63 time=8.89 ms
64 bytes from 172.0.0.1: icmp_seq=4 ttl=63 time=8.15 ms
^C
--- 172.0.0.1 ping statistics ---
4 packets transmitted, 4 received, 0% packet loss, time 3003ms
rtt min/avg/max/mdev = 6.280/7.586/8.896/1.011 ms
Note
Our DNN does not actually provide access to the internet, so you won’t be able to reach the other sites.Step 9: Change the Capacities of the UPF and SMF NFs
In this step, you will change the capacity requirements for the UPF and SMF, and see how the operator reconfigures the Kubernetes resources used by the network functions.
The capacity requirements are captured in a custom resource (capacity.yaml) within the deployed package. You can edit this value with the CLI, or use the web interface. Both options lead to the same result, but using the web interface is faster. First, you will vertically scale the UPF using the CLI.
To create a new package revision, you need to start by retrieving the PackageVariant downstream target name.
kubectl config use kind-kind
kubectl get packagevariant edge-free5gc-upf-edge01-free5gc-upf -o jsonpath='{.status.downstreamTargets[0].name}'
The output is similar to:
edge01-6b26ca0f4fdf83212a73faff159bd013b41207ee
This way you retrieve the downstream target name of the package. You can also retrieve this information by using the
kubectl describe command on the UPF PackageVariant.
Next create a new package revision from the existing UPF package.
porchctl rpkg copy -n default edge01-6b26ca0f4fdf83212a73faff159bd013b41207ee --workspace upf-scale-package
The output is similar to:
edge01-40c616e5d87053350473d3ffa1387a9a534f8f42 created
The output contains the package revision of our newly cloned upf package. Pull the package to a local directory of your choice (in the example you can use /tmp/upf-scale-package).
porchctl rpkg pull -n default edge01-40c616e5d87053350473d3ffa1387a9a534f8f42 /tmp/upf-scale-package
You can inspect the contents of the package in the chosen directory. The UPF configuration is located in the capacity.yaml file.
cat /tmp/upf-scale-package/capacity.yaml
The output is similar to:
apiVersion: req.nephio.org/v1alpha1
kind: Capacity
metadata: # kpt-merge: /dataplane
  name: dataplane
  annotations:
    config.kubernetes.io/local-config: "true"
    specializer.nephio.org/owner: workload.nephio.org/v1alpha1.UPFDeployment.upf-edge01
    specializer.nephio.org/namespace: free5gc-upf
    internal.kpt.dev/upstream-identifier: 'req.nephio.org|Capacity|default|dataplane'
spec:
  maxUplinkThroughput: 5G
  maxDownlinkThroughput: 5G
The contents of the package will be mutated using kpt functions to adjust the UPF configuration, however you can also manually edit the file. Apply the kpt functions to the contents of the kpt package with a new value for the throughputs of your choice.
kpt fn eval --image gcr.io/kpt-fn/search-replace:v0.2.0 /tmp/upf-scale-package -- by-path='spec.maxUplinkThroughput' by-file-path='**/capacity.yaml' put-value=10
kpt fn eval --image gcr.io/kpt-fn/search-replace:v0.2.0 /tmp/upf-scale-package -- by-path='spec.maxDownlinkThroughput' by-file-path='**/capacity.yaml' put-value=10
The output is similar to:
[RUNNING] "gcr.io/kpt-fn/search-replace:v0.2.0"
[PASS] "gcr.io/kpt-fn/search-replace:v0.2.0" in 6.3s
  Results:
    [info] spec.maxUplinkThroughput: Mutated field value to "10"
[RUNNING] "gcr.io/kpt-fn/search-replace:v0.2.0"
[PASS] "gcr.io/kpt-fn/search-replace:v0.2.0" in 400ms
  Results:
    [info] spec.maxDownlinkThroughput: Mutated field value to "10"
Observe the changes to the UPF configuration using the kpt pkg diff command.
kpt pkg diff /tmp/upf-scale-package | grep linkThroughput
The output is similar to:
From https://github.com/nephio-project/catalog
 * tag               workloads/free5gc/pkg-example-upf-bp/v2.0.0 -> FETCH_HEAD
Adding package "workloads/free5gc/pkg-example-upf-bp".
<   maxUplinkThroughput: 10
<   maxDownlinkThroughput: 10
>   maxUplinkThroughput: 5G
>   maxDownlinkThroughput: 5G
<     maxDownlinkThroughput: 5G
<     maxUplinkThroughput: 5G
Next, progress through the package lifecycle stages by pushing the changes to the package to its repository, proposing the changes and approving them.
porchctl rpkg push -n default edge01-40c616e5d87053350473d3ffa1387a9a534f8f42 /tmp/upf-scale-package
porchctl rpkg propose -n default edge01-40c616e5d87053350473d3ffa1387a9a534f8f42
porchctl rpkg approve -n default edge01-40c616e5d87053350473d3ffa1387a9a534f8f42
The output is similar to:
[RUNNING] "gcr.io/kpt-fn/apply-replacements:v0.1.1"
[PASS] "gcr.io/kpt-fn/apply-replacements:v0.1.1"
[RUNNING] "gcr.io/kpt-fn/apply-replacements:v0.1.1"
[PASS] "gcr.io/kpt-fn/apply-replacements:v0.1.1"
[RUNNING] "gcr.io/kpt-fn/set-namespace:v0.4.1"
[PASS] "gcr.io/kpt-fn/set-namespace:v0.4.1"
  Results:
    [info]: all namespaces are already "free5gc-upf". no value changed
[RUNNING] "docker.io/nephio/nfdeploy-fn:v2.0.0"
[PASS] "docker.io/nephio/nfdeploy-fn:v2.0.0"
[RUNNING] "docker.io/nephio/interface-fn:v2.0.0"
[PASS] "docker.io/nephio/interface-fn:v2.0.0"
[RUNNING] "docker.io/nephio/dnn-fn:v2.0.0"
[PASS] "docker.io/nephio/dnn-fn:v2.0.0"
[RUNNING] "docker.io/nephio/nad-fn:v2.0.0"
[PASS] "docker.io/nephio/nad-fn:v2.0.0"
[RUNNING] "docker.io/nephio/dnn-fn:v2.0.0"
[PASS] "docker.io/nephio/dnn-fn:v2.0.0"
[RUNNING] "docker.io/nephio/interface-fn:v2.0.0"
[PASS] "docker.io/nephio/interface-fn:v2.0.0"
[RUNNING] "docker.io/nephio/nfdeploy-fn:v2.0.0"
[PASS] "docker.io/nephio/nfdeploy-fn:v2.0.0
edge01-40c616e5d87053350473d3ffa1387a9a534f8f42 proposed
edge01-40c616e5d87053350473d3ffa1387a9a534f8f42 approved
You can check the current lifecycle stage of a package using the porchctl rpkg get command.
porchctl rpkg get | grep free5gc-upf
The output is similar to:
NAME                                                               PACKAGE                              WORKSPACENAME          REVISION   LATEST   LIFECYCLE   REPOSITORY
edge01-5e5621cee05df46c3e9ad6dd50ab485f4ebeeffd                      free5gc-upf                          upf-scale-package   main       false    Published   edge01
edge01-6b26ca0f4fdf83212a73faff159bd013b41207ee                      free5gc-upf                          packagevariant-1    v1         false    Published   edge01
edge01-40c616e5d87053350473d3ffa1387a9a534f8f42                      free5gc-upf                          upf-scale-package   v2         true     Published   edge01
edge02-b5d2931f75d20d95e7d3d9b1fb10bcfa9156b9ba                      free5gc-upf                          packagevariant-1    main       false    Published   edge02
edge02-be05d7134eca3e02fecd63c4e4031f728d5f0e84                      free5gc-upf                          packagevariant-1    v1         true     Published   edge02
Additionally you can check the Gitea edge01 repository (accessible at http://localhost:3000/nephio/edge01) for new commits to see how Porch interacts with packages stored in Git repositories.
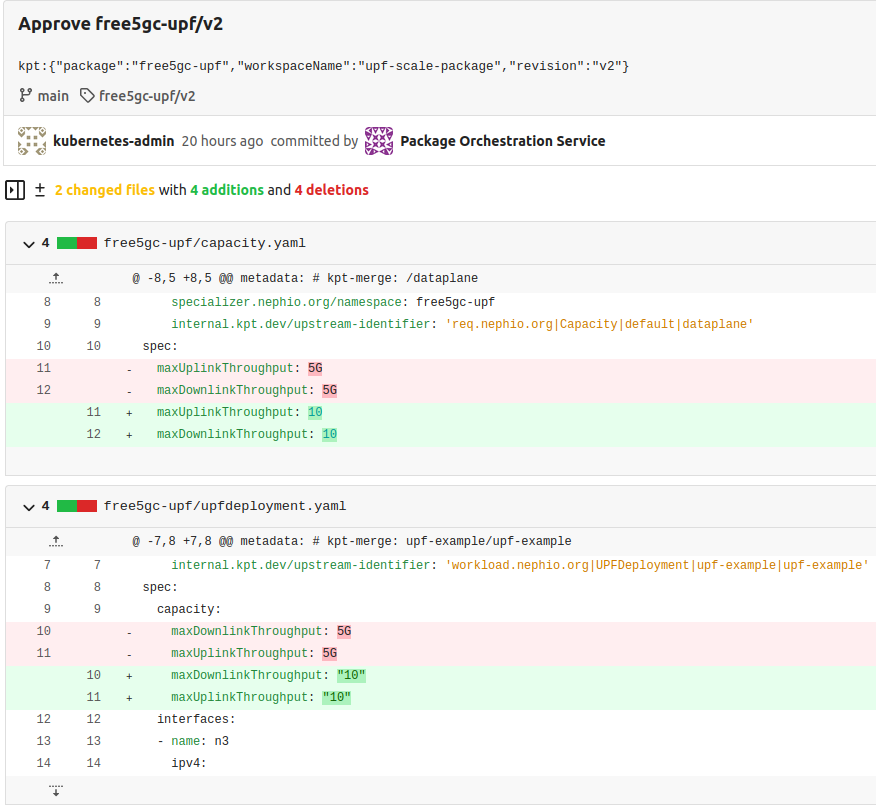
After the package is approved, the results can be observed in Nephio Web UI. Head over to http://localhost:7007/config-as-data ( port forwarding must be running).
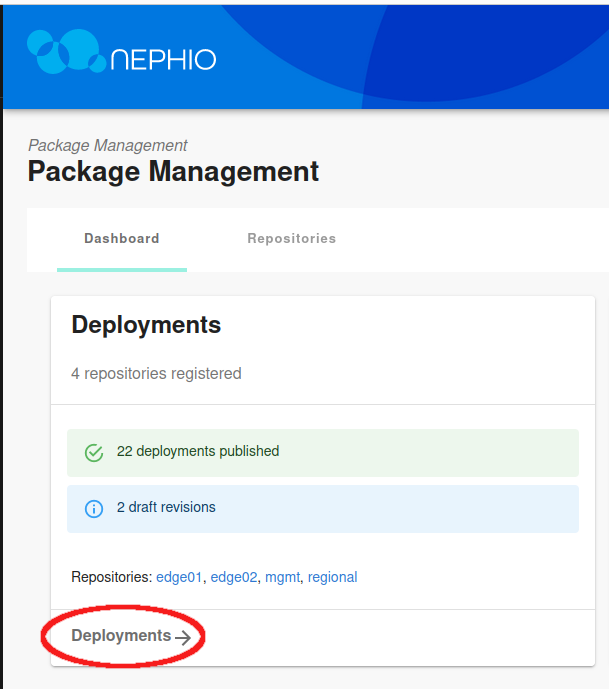
Inside the package, you can see that the throughput values for UPF have been modified, reflecting the changes you made with the CLI.
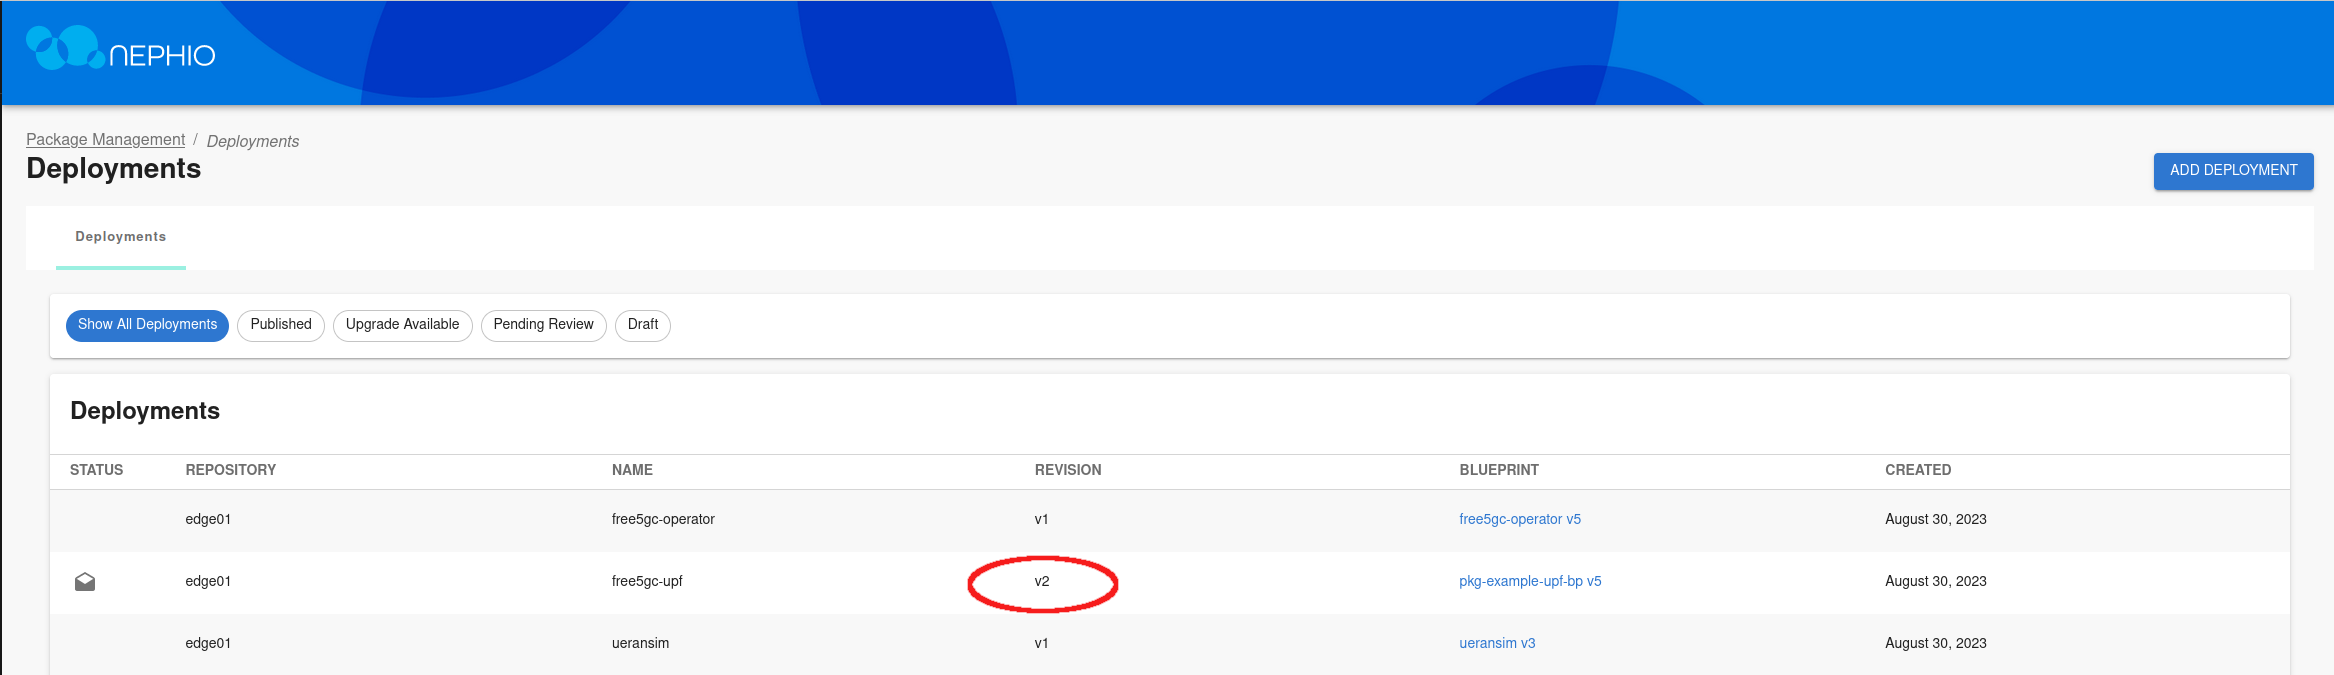
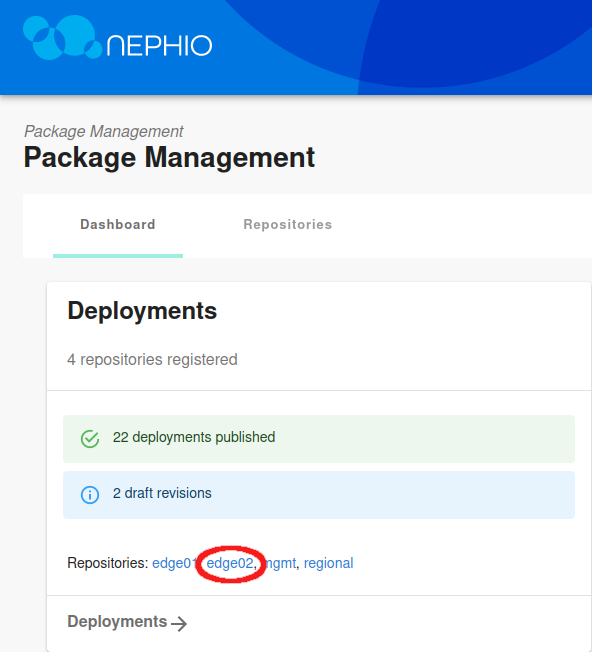
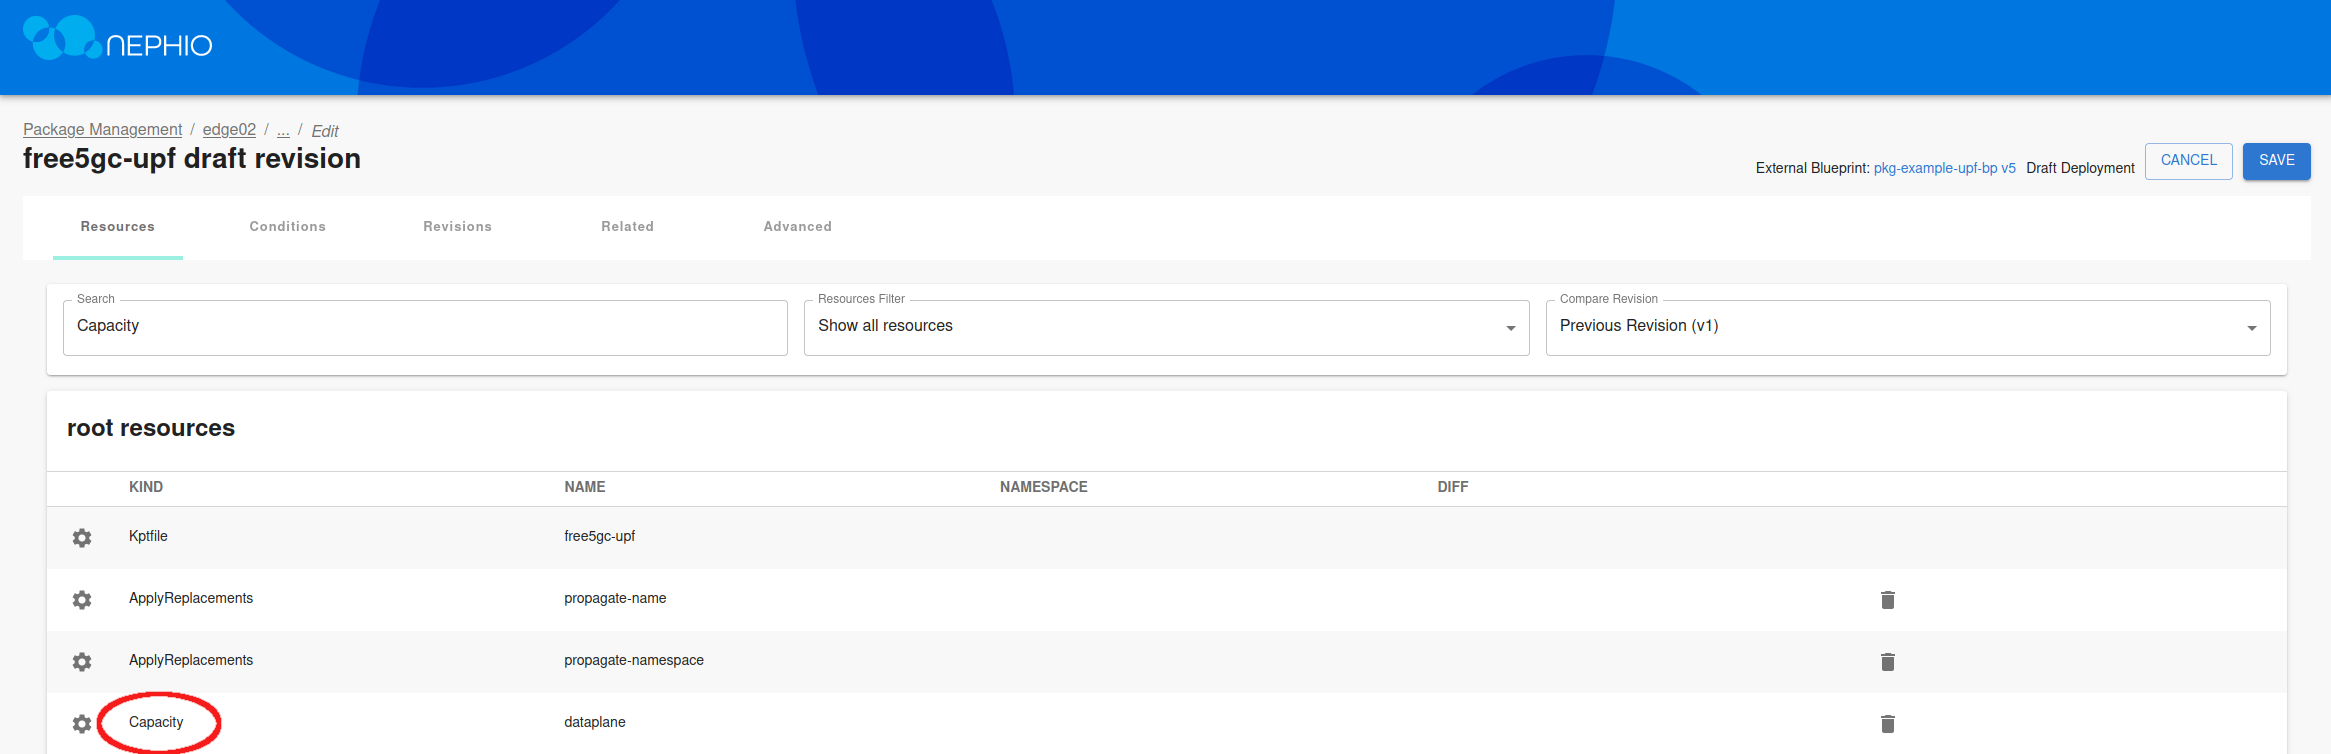
You can also scale NFs vertically using the Nephio Web UI. For practice you can scale the UPF on the second edge cluster. Once again, navigate to the Web UI and choose the edge02 repository in the Deployments section.
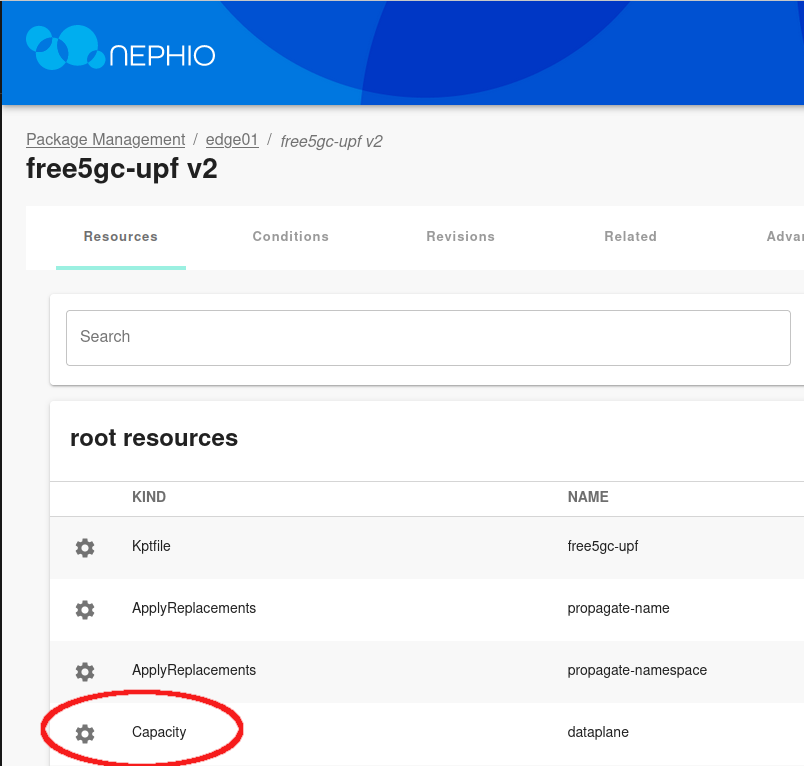
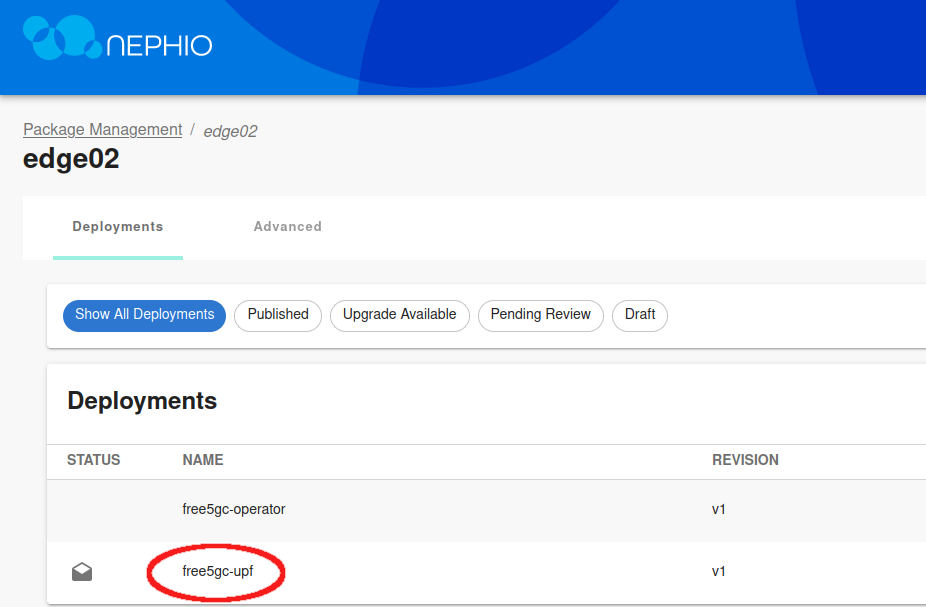
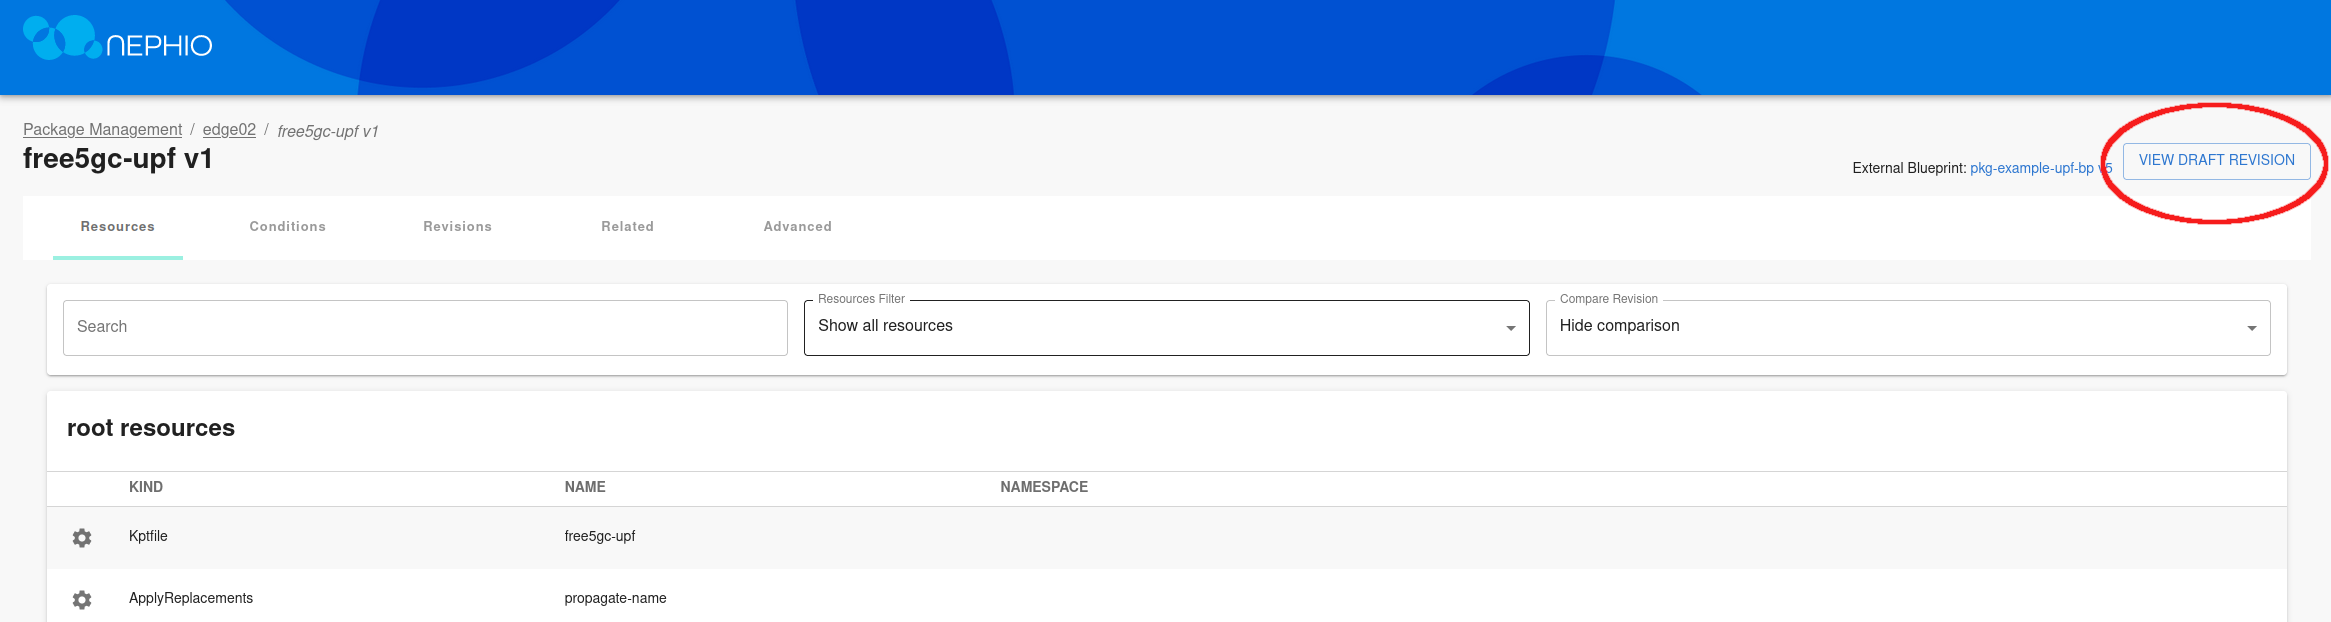
Select the free5gc-upf deployment, and then View draft revision.
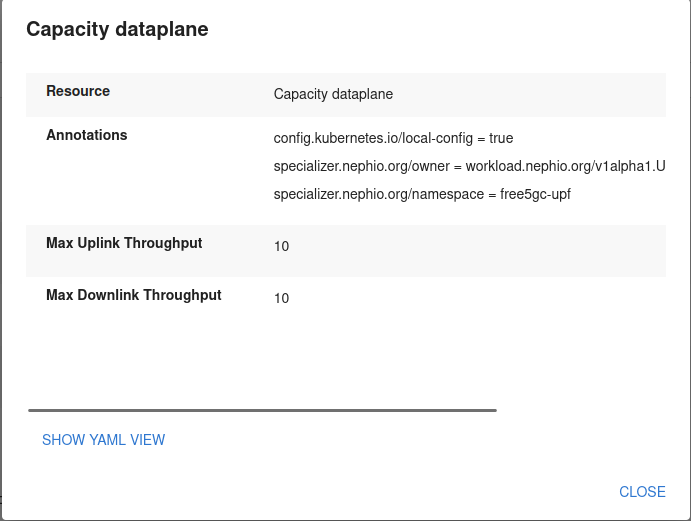
Edit the draft revision, and modify the Capacity.yaml file.
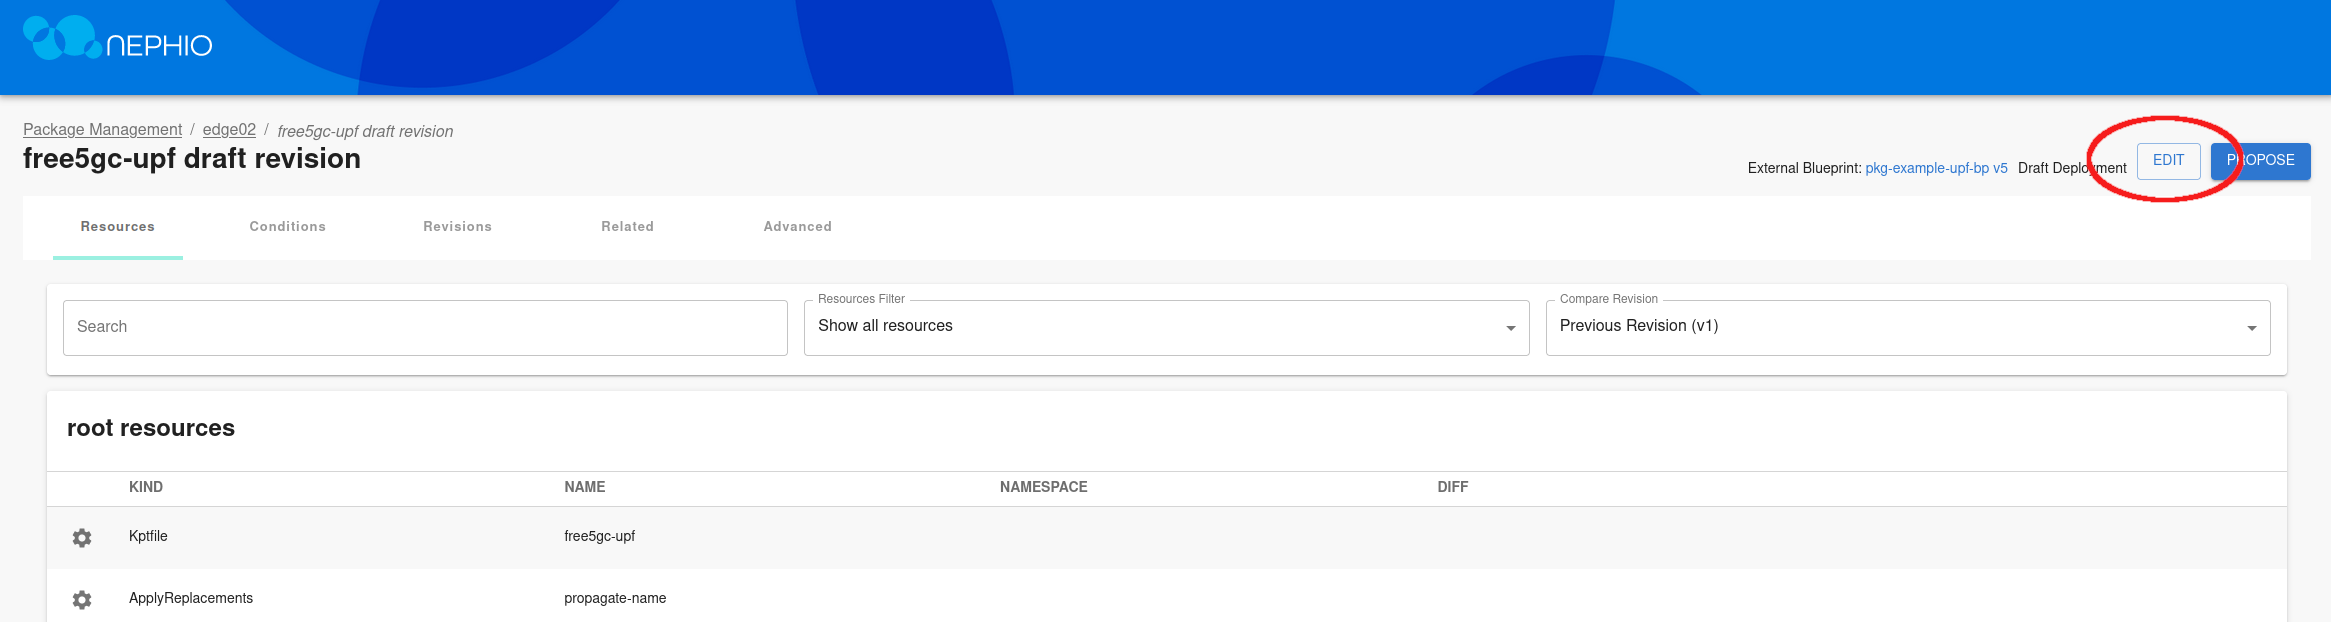
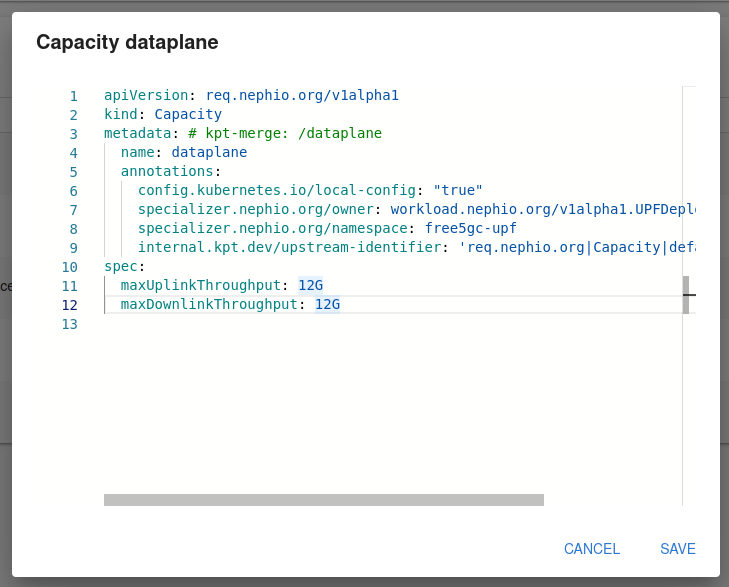
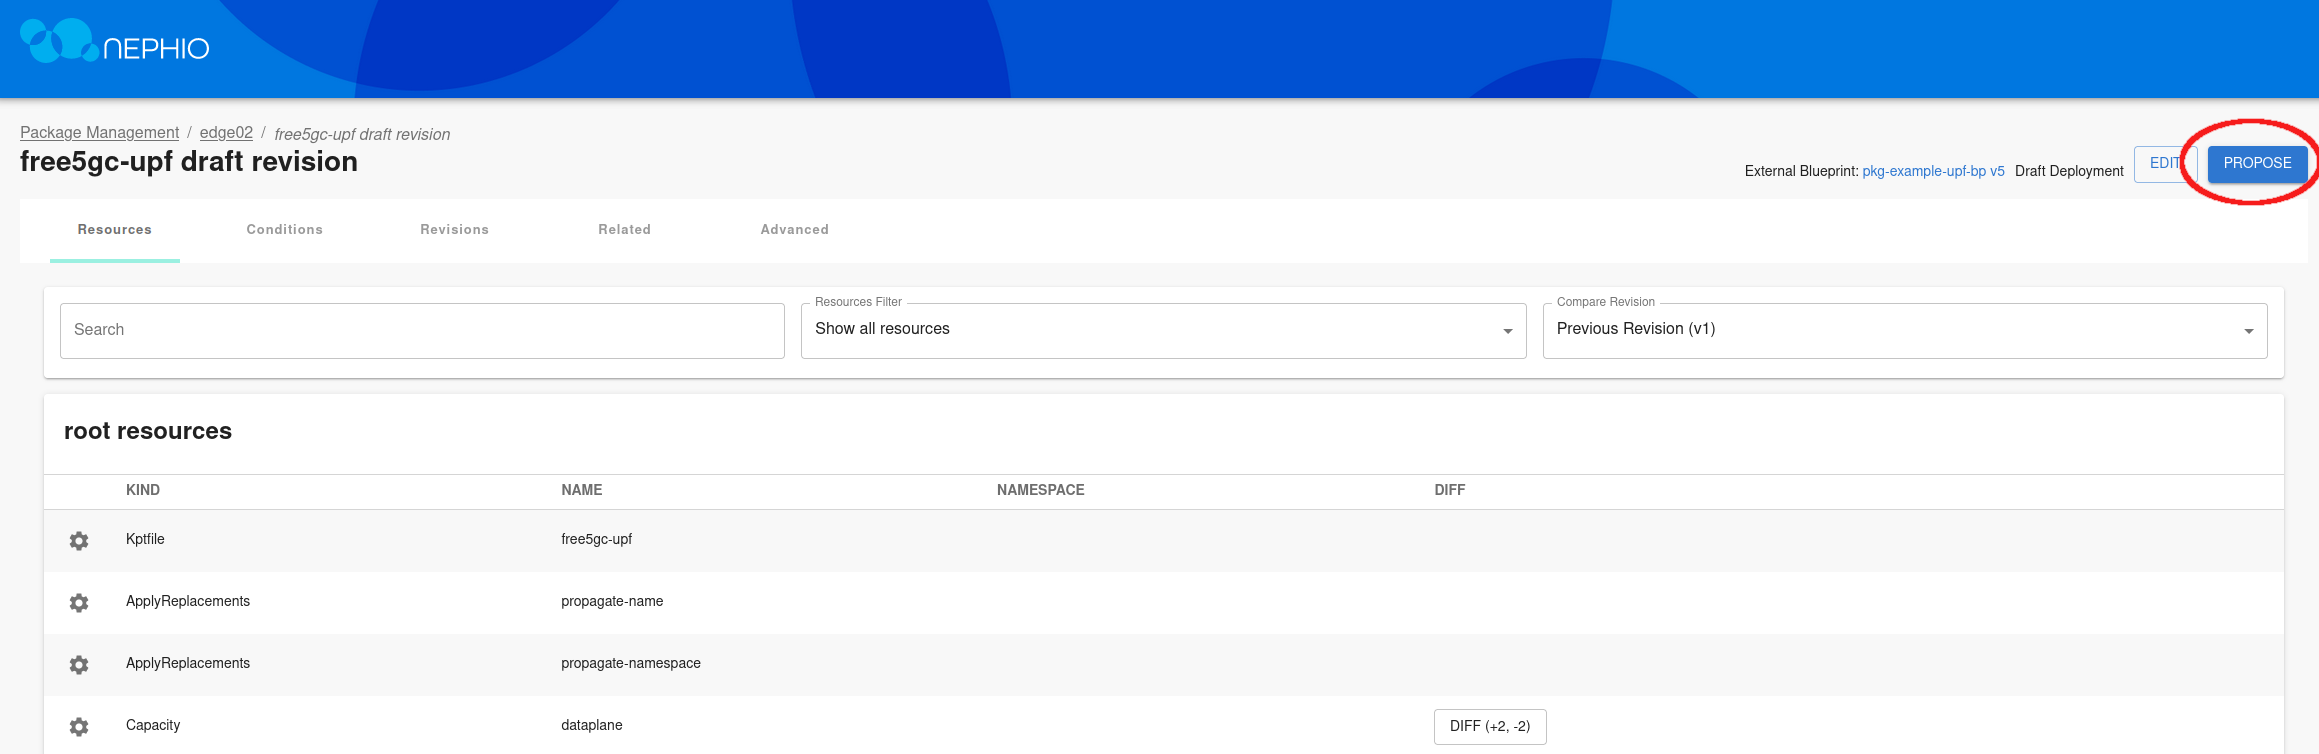
After saving the changes to the file, propose the draft package and approve it.
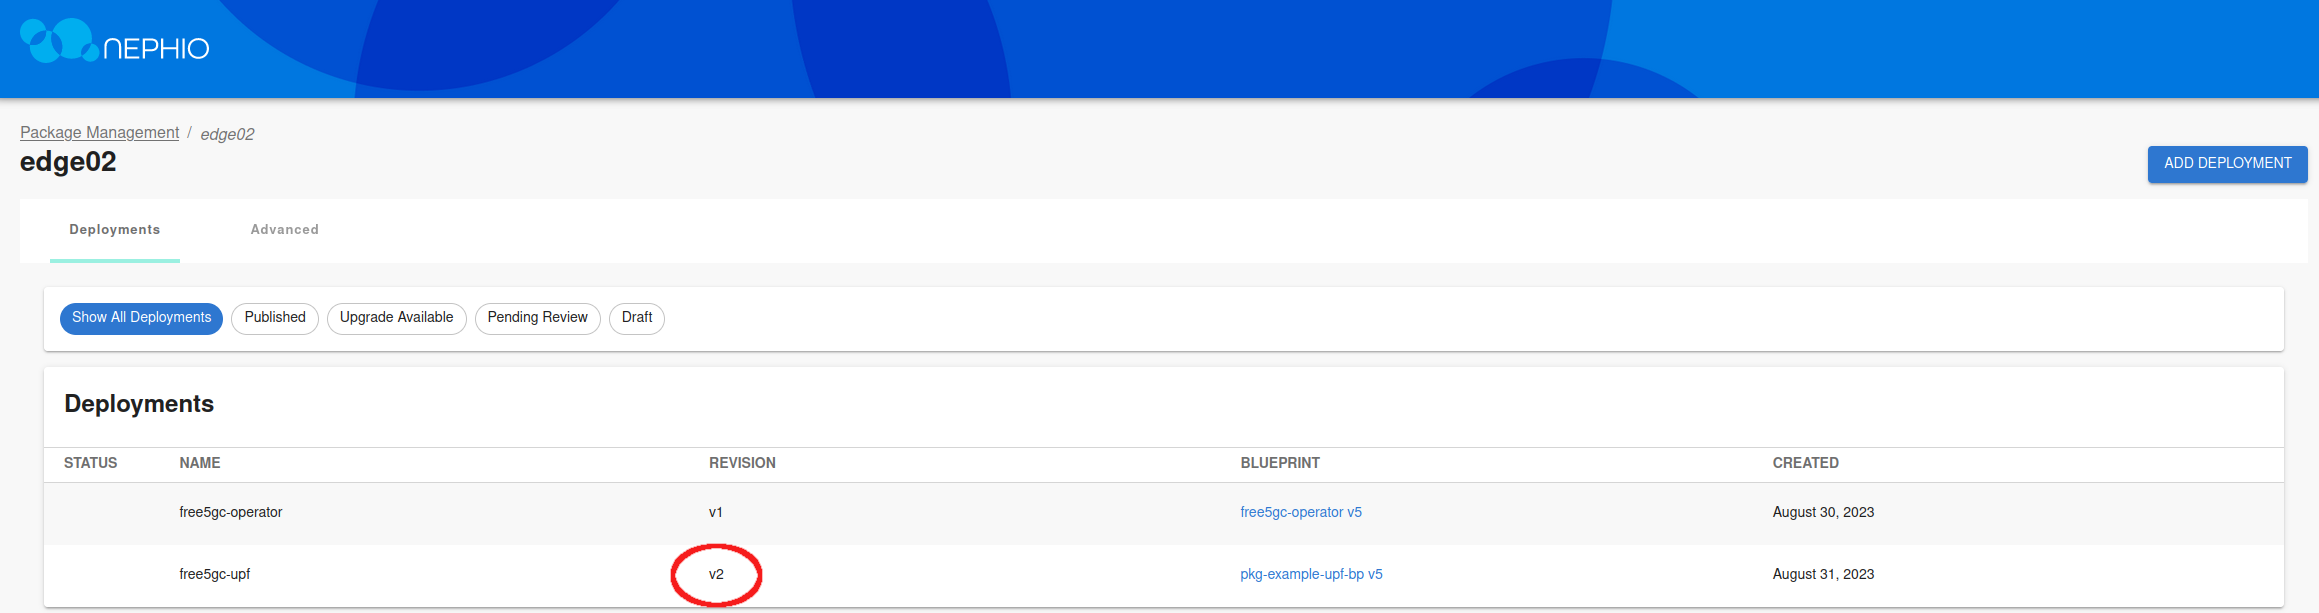
After a few minutes, the revision for the UPF deployment will change, and the changes will be reflected in the edge-02 cluster.
NOTE: You will observe that the UPF NFDeployment on the workload clusters is updated and synced with Gitea. The UPF pod will not reflect the new information. This is because the Nephio free5gc operator is not updating the pod with new configuration.